
















Mini P.E.K.K.A Costume Guide from Clash Royale
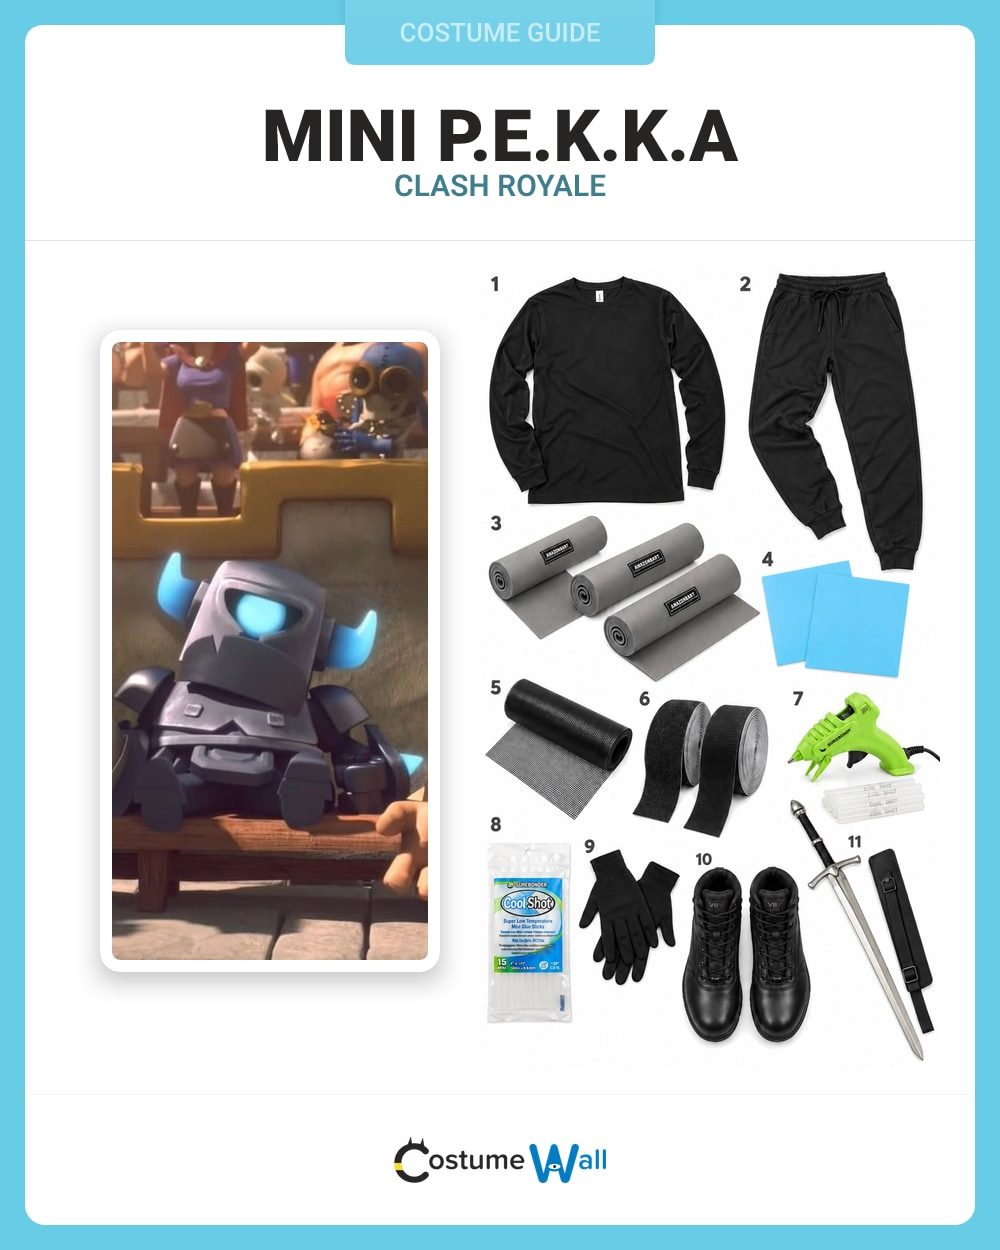
DIY Costume Items
- Black Long-Sleeve Shirt See on Amazon
- Black Joggers See on Amazon
- Gray EVA Foam Rolls See on Amazon
- Light-Blue EVA Sheets See on Amazon
- Black Viewing Mesh See on Amazon
- Hook-and-Loop Tape See on Amazon
- Cool Shot Glue Tool See on Amazon
- Cool Shot Glue Refills See on Amazon
- Black Gloves See on Amazon
- Black Tactical Boots See on Amazon
- Foam Costume Sword See on Amazon
Best Mini P.E.K.K.A Costume Guide
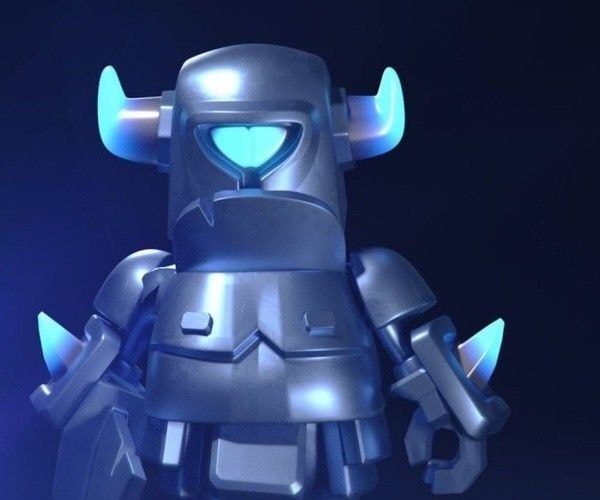
Mini P.E.K.K.A brings a lot of armor to a very small Clash Royale troop. The barrel-shaped helmet, single cyan eye and two upturned blue horns make the character recognizable before you even add the sword. Gray shoulder plates, chunky gauntlets and blocky feet carry that shape through the rest of the outfit, while black gaps separate the moving joints. Pancakes are a fun nod to the official promotional animation if your costume group wants an extra joke.
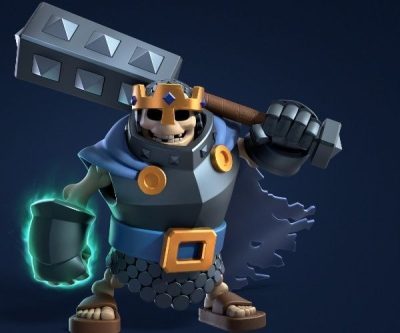
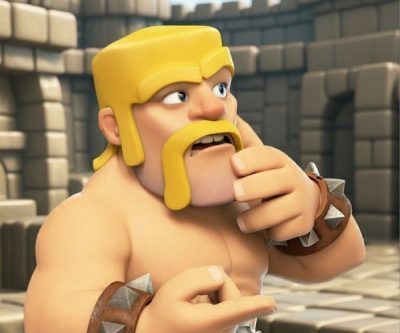
This version uses matte EVA foam over a black shirt and joggers. You will make the helmet and armor yourself, with a blue rim around a black mesh viewing window standing in for the glowing eye. It is a paper-fit project rather than a ready-made suit, so leave time to adjust each piece to your body. For a Clash Royale group, team up with King or Barbarian.
ProjectAdult foam-armor costume
TechniquePaper patterns, cutting and low-temperature gluing
Materials
From the Kit
Use three gray 16-by-59-inch rolls of 5 mm EVA, one pack of two light-blue 10-inch-square sheets, black viewing mesh, hook-and-loop tape, the Cool Shot glue tool and its compatible CS-15 refill sticks. The black shirt, joggers, gloves and boots form the base. The finished foam sword comes with a sheath.
From Home
Gather large paper or joined newspaper sheets, a measuring tape, ruler, pencil, masking tape and sturdy craft scissors. Use a craft knife only with a cutting mat and adult handling. A spare bowl or rounded container can help curve shoulder foam by hand. Keep scraps for reinforcing tabs and seams.
Buy enough foam
The shopping image shows raw supplies. Buy three gray rolls; each is about 40 by 150 cm. Lay every paper pattern on the foam before cutting. Larger builds or wider shoulder armor may need more. Only one shirt is worn from its four-pack; the example shirt, trousers and boots have independent sizes.
Make a wearable helmet
Use a single layer of mesh and keep the helmet bottom open. The blue foam goes around the viewing opening, never across it. Test the mesh against your eyes in the lighting where you will wear it. This build uses hand-curved foam, not heat shaping; follow the glue tool’s instructions and test its bond on scraps first.
Build the Mini P.E.K.K.A Armor
1. Fit the helmet and mesh window
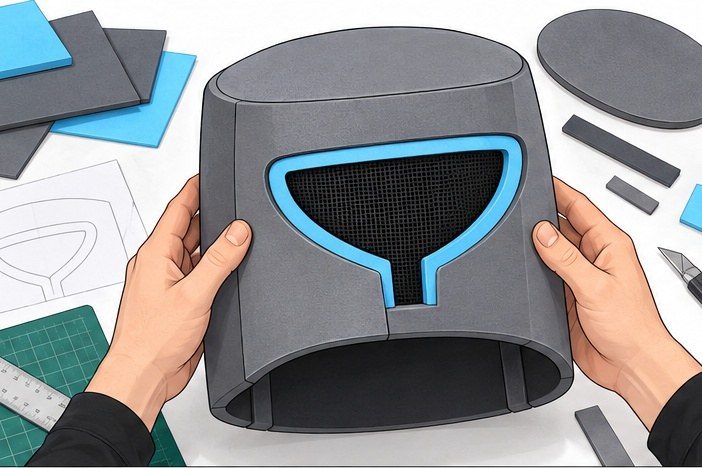
Wrap paper loosely around the widest part of your head, leaving room for your nose, ears and glasses if needed. Mark a cylinder roughly 26–28 cm tall, with about 8–10 cm of extra circumference for clearance and a rear overlap. These are starting measurements: tape the paper shell together, try it on and mark your actual eye level. It must lift off easily.
Flatten the pattern onto the first gray roll and cut the helmet wall. Cut a wide, rounded, downward-pointing shield window at eye level, starting around 16 cm wide and 9–10 cm tall. Enlarge it until both eyes can see comfortably. Curve the foam into its cylinder and join the rear overlap off your head. Reinforce the inside seam with a narrow gray strip.
Trace the top opening onto paper, add a narrow overlap allowance and cut an oval foam cap. Glue it to the top with short foam tabs inside. Cut mesh about 2 cm larger than the viewing opening on every side and glue only its outer margin to the inside. Cut a light-blue border around a matching paper window template and glue it outside the opening. Keep the center clear and the bottom of the helmet open.
Check: Try the helmet on before adding horns. Look left, right and down, turn your head and remove it without help. If vision or breathing feels restricted, enlarge the openings or refit the shell before continuing.
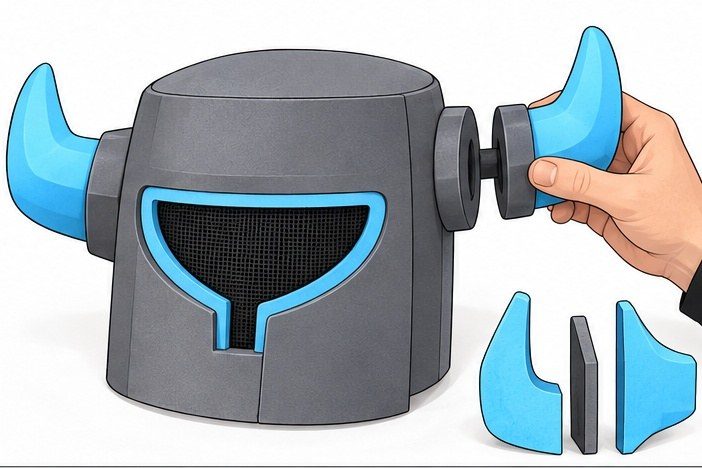
2. Add the two blue horns
Draw one short horn on paper: a broad base that curves outward and then turns upward into a rounded tip. Start around 12 cm tall and 8 cm wide. Cut four matching light-blue profiles, flipping the pattern for the opposite side. Arrange them on the two blue sheets before cutting, saving space for the window rim and wrist details.
Make each horn from two profiles with a narrow gray foam spacer between them, as shown. Keep the horn soft and blunt; no wire or rigid core is needed. Cut two broad gray circular mounting pads and glue one horn to each pad. Attach the pads to the sides of the helmet, level with each other, using extra gray tabs on the inside to spread the load. Let every joint set as directed by the adhesive maker.
Check: Gently flex the horn bases while the helmet is off. The pads should stay attached without pulling the helmet wall inward. Keep the horns short enough to clear doorways and nearby people.
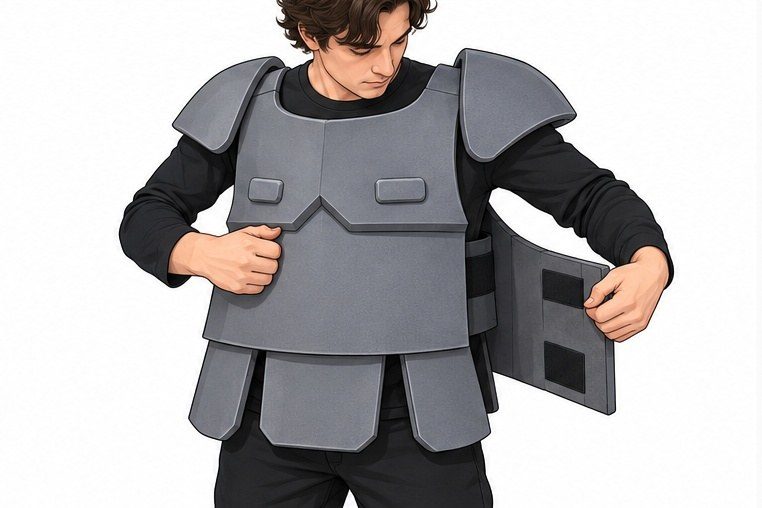
3. Make the chest, shoulders and hip plates
Over the black shirt, paper-fit a loose front-and-back tabard. A strip about 40 cm wide and 90–100 cm long is a starting point for an adult: fold it over the shoulders and cut a roomy head opening at the fold. Adjust its length so the lower edge sits around the hips. Transfer the fitted pattern to the second gray roll. If a single strip is too narrow, make separate wider front and back panels and join them at the shoulders with reinforced foam tabs.
Cut a shallow V-shaped collar overlay from the offcuts and glue it onto the upper chest. Add two small rounded rectangles for the chest details. For the shoulder caps, start with paper rectangles around 25 by 18 cm, round the outer corners and curve the foam by hand over a bowl. Small overlapping corner darts help them hold a dome. Glue their inner edges to reinforced shoulder tabs on the tabard, leaving the arms free.
Divide the bottom 10–12 cm of the tabard into three broad hip flaps and round their corners. Leave black gaps between them. Add short hook-and-loop straps across the open sides at the waist. Sandwich each strap end between a pair of gray foam tabs, and test the adhesive on scraps before relying on it. Keep the closures reachable and easy to undo.
Check: Lift your arms, sit and bend at the hips. Shorten any plate that presses against your neck or catches your thighs. Side straps should hold the tabard loosely rather than squeeze the body.
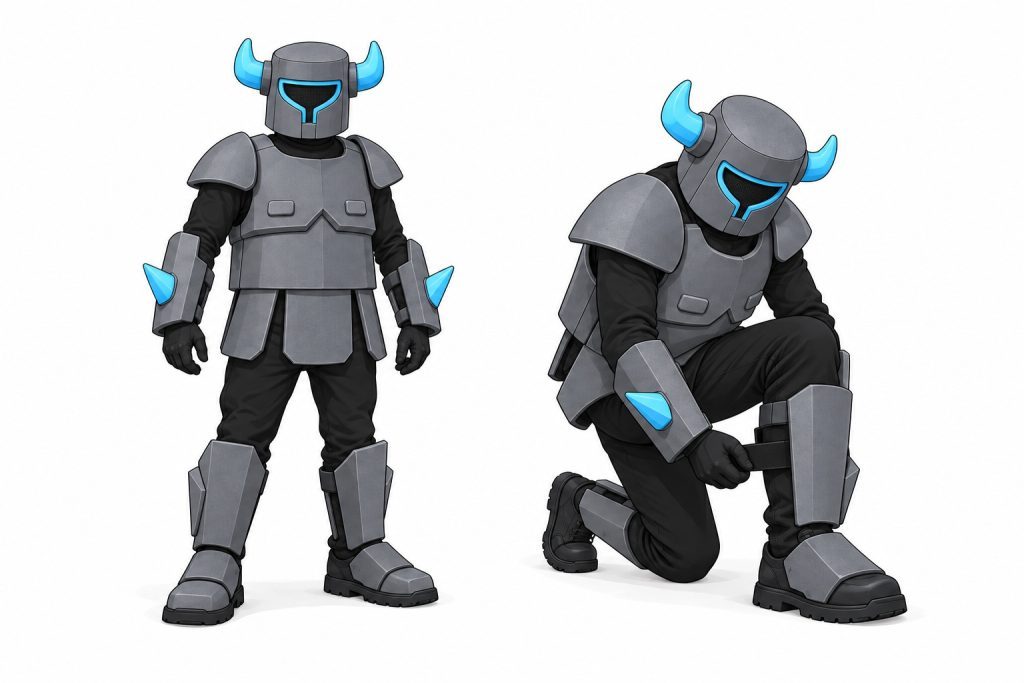
4. Finish the cuffs and leg plates
Use the third gray roll for two forearm cuffs and two shin plates. Paper-wrap each forearm over the shirt, allowing overlap and room to bend the wrist; a roughly 30-by-18-cm rectangle is a starting size. Round the corners, curve the foam and make an openable hook-and-loop seam. Add narrow gray overlays to give each cuff a boxier outline, plus one short, rounded light-blue foam spike on the outer side. Black gloves remain separate underneath.
Paper-fit shin panels from below the knee to above the ankle, starting around 34 by 25 cm. Curve them around the front of the legs and secure them with two openable hook-and-loop straps at the calves. Reinforce strap ends between foam tabs. Add a smaller curved instep plate to each boot with a strap around the boot’s upper, above the sole. Leave the heel, walking sole and ankle bend clear. Trim plates that catch the floor or each other.
Dress in the black base and boots, fasten the tabard, then add cuffs and leg plates. Put the helmet on last with a helper nearby. Walk slowly, bend your knees, reach for the closures and check visibility in the actual lighting. Wear the finished foam sword and sheath only where costume props are allowed; its slimmer shape is a practical substitute for the game’s broad blade.
Check: Both feet must stand flat with nothing under the soles. Remove the helmet for stairs, crowded areas or any situation where the mesh limits your view. Keep a helper within reach while wearing it.
Quick Fixes
The helmet slips
Add small soft foam pads at the sides, then retest the eye line. Do not tighten the bottom opening around your neck.
A closure peels away
Take the piece off, reglue the strap between larger foam tabs and let it set fully. A loose flap is better removed than taped onto skin.
The armor catches when you move
Shorten the hip flaps or shin plates and round the new edges. Preserve black gaps at elbows, knees and ankles.
The eye looks too dark
Widen the light-blue border for color contrast. Keep the mesh unpainted and use fewer layers rather than covering the viewing holes.
Mini P.E.K.K.A Cosplay Costumes
Start with a black long-sleeve shirt, black joggers, gloves, and boots. These make the dark gaps between Mini P.E.K.K.A’s armor plates and keep the outfit comfortable underneath. For the armor, use three gray 16-by-59-inch rolls of 5 mm EVA foam and one pack of two 10-by-10-inch light-blue 5 mm sheets. Make paper patterns first, then check every piece against the wearer before cutting. The roll dimensions describe the supplies; adjust your paper patterns to your own measurements.
Cut and assemble the gray chest, broad shoulders, short hip plates, cuffs, and shin and boot plates. Curve the foam by hand, without a heat gun, and use the Cool Shot glue tool with its compatible refill to join pieces. Use reinforced hook-and-loop closures at the waist sides, cuffs and leg plates, while the shoulder caps stay glued to the tabard. For the barrel helmet, leave the bottom open and cut one wide eye window aligned with the wearer’s eyes. Cover it with black see-through mesh, add a light-blue rim, and attach two blunt blue foam horns. Check fit, vision, and breathing before wearing it, and keep closures removable.
Finish with the foam costume sword and its sheath if your venue allows props. It is a costume accessory, not a functional weapon. The result is matte foam rather than shiny metal, but the silhouette still says Mini P.E.K.K.A loud and clear.
Mini P.E.K.K.A Costume FAQs
A few quick tips will help your Mini P.E.K.K.A armor look bold and stay wearable.
Trace paper patterns and test them over the black clothes before cutting foam. Adjust each piece to the wearer, since these are starting patterns, not a graded fit.
Use a wide, single-layer black mesh window at your eye level, then test it in the lighting at your event. Enlarge the opening if needed and remove the helmet whenever your view is limited.
Glue the shoulder caps and decorative layers to the tabard with the Cool Shot tool and compatible refill. Use reinforced hook-and-loop straps at the waist sides, cuffs and leg plates so those closures open for dressing.
The foam is curved by hand, so no heat gun is needed. The Cool Shot glue tool still uses heat: follow its instructions, handle it carefully and let the joints set before wearing.
The foam sword is a nonfunctional costume prop, and some venues may not allow props. Leave it at home if your event's rules say no.
About Mini P.E.K.K.A
Mini P.E.K.K.A is a troop in Clash Royale. Its standard design has a gray barrel helmet, a single cyan eye, two light-blue upturned horns, broad gray armor plates with black gaps, blue wrist spikes, blocky feet, and a gray sword with a dark handle. The official promotional animation also puts pancakes in the spotlight, which gives this armored character a fun, memorable extra detail.
Cosplayers can recognize the troop through its chunky silhouette and strong gray-and-blue contrast. This costume translates the armor into matte EVA foam worn over black clothing, with mesh in the eye opening so the wearer can see. Soft boots under foam plates stand in for the blocky feet, and a finished foam sword suggests the game weapon. The design is the standard Mini P.E.K.K.A, rather than the larger P.E.K.K.A or a gold Hero version.