




Essential Queen Items
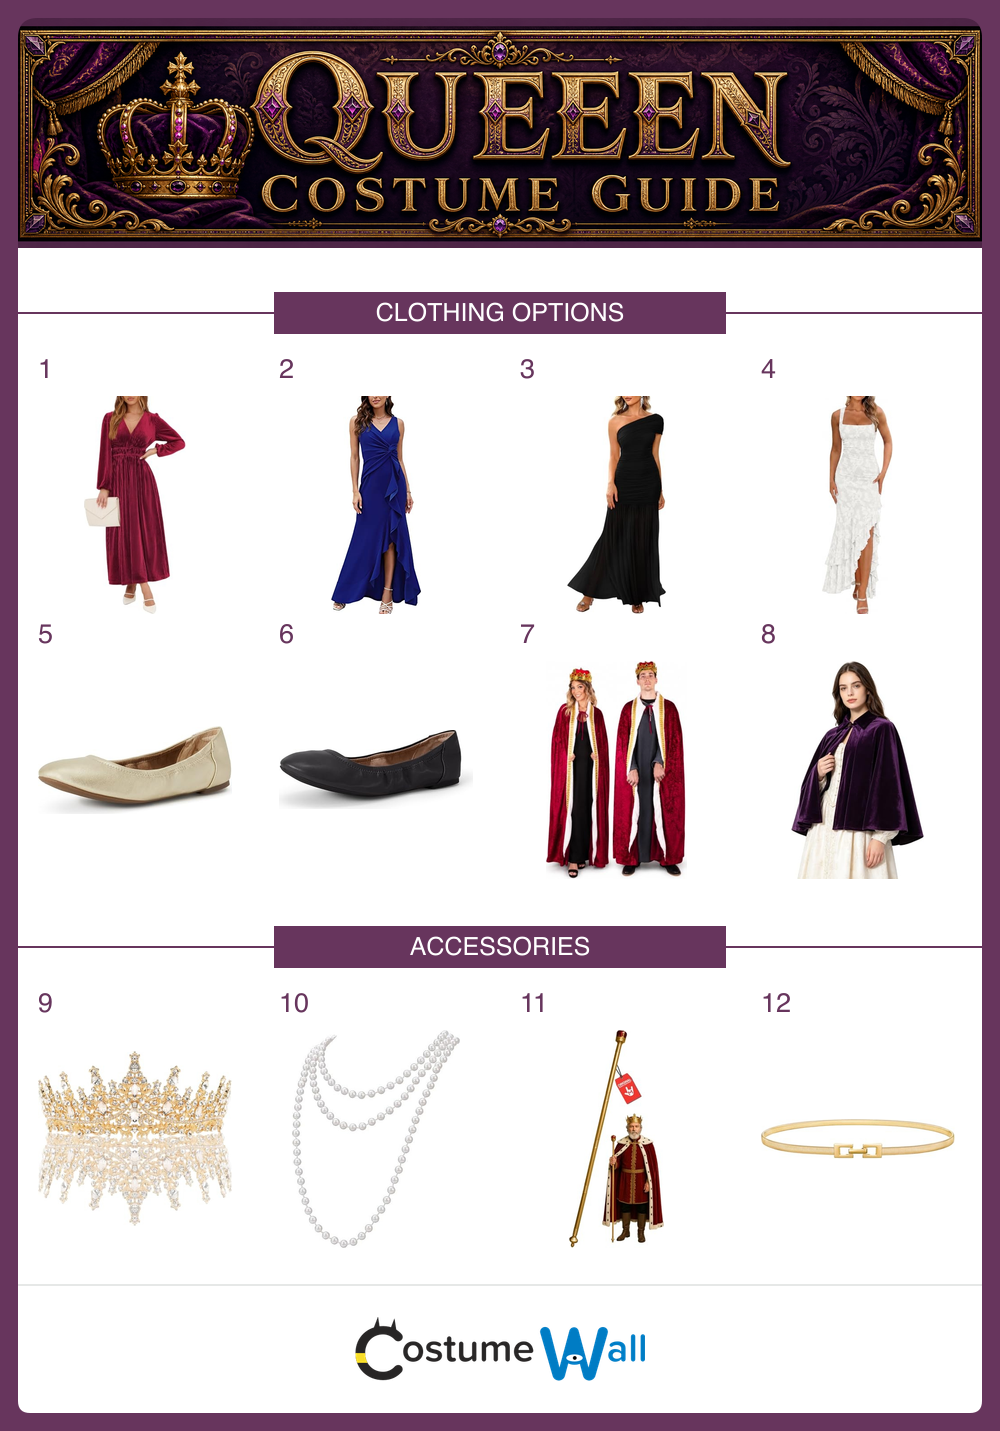
Clothing Options
Choose one base outfit; these pieces are alternatives.
- Burgundy Velvet Midi DressSee on Amazon
- Royal Blue Evening DressSee on Amazon
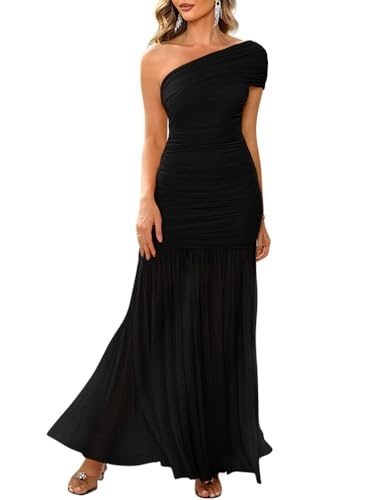
- Black One Shoulder Evening DressSee on Amazon
- White Ruched Maxi DressSee on Amazon
- Gold Ballet FlatsSee on Amazon
- Black Ballet FlatsSee on Amazon
- Red Velvet Royal RobeSee on Amazon
- Purple Velvet Short CapeSee on Amazon
Accessories
Choose the details that suit your version; you do not need every accessory.
- Gold Queen TiaraSee on Amazon
- Long Faux Pearl NecklaceSee on Amazon
- Gold Plastic Royal ScepterSee on Amazon
- Gold Cinch Waist BeltSee on Amazon
How to Dress Like a Queen
A queen costume is recognizable because of its silhouette and symbols: a long dress creates the formal base, while a crown immediately establishes the royal role. A cape, pearl necklace, gold belt or scepter can add more ceremony, but they are separate accessories rather than requirements. Choose one main dress first and build outward from there.
The four outfit cards are alternatives, not pieces to layer together. Burgundy velvet gives a classic ceremonial effect, royal blue feels like a ballroom queen, black with purple reads as dramatic court wear, and white with gold looks bright and formal. Adults of any gender can adapt the silhouettes, colors and accessories with clothes that fit comfortably.
Use items you already own wherever possible, especially long dresses, dark flats, costume jewelry and wrap-style outer layers. Suggested shopping pieces are simply alternatives for missing parts; select the fit and coverage you prefer. The steps below are no-sew and focus on arranging the dress, shoes, cape and crown so the costume stays practical through a party.
Assembly timeAbout 15–25 minutes*
BudgetReuse or shop individual pieces
Works asSolo, duo or group
DIY levelEasy · no sewing required
*Estimated dressing and simple styling time once you have the pieces. Allow extra time for homemade details; cost depends on what you already own.
Six Queen Character Costumes
Choose a named royal outfit, from a dramatic storybook crown to the distinctive gowns of Arendelle. Follow each guide for that queen’s own colors and accessories.
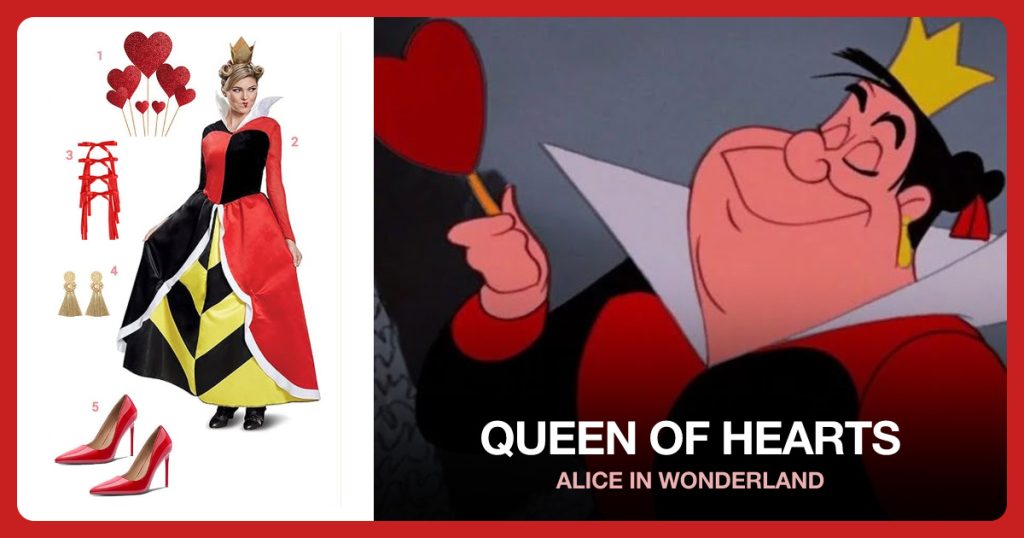
Queen of Hearts
Use the animated queen’s red-and-black royal dress and playing-card heart details.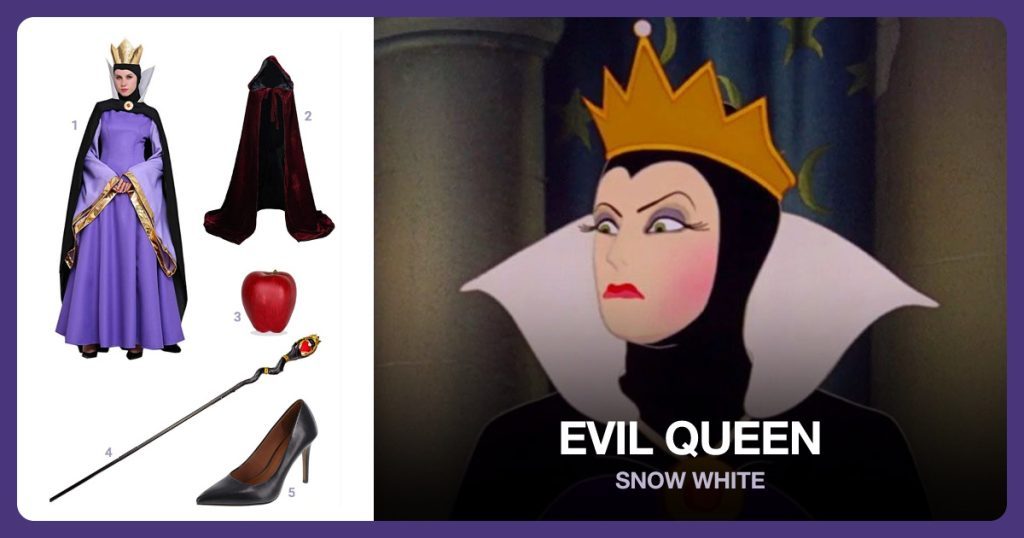
Evil Queen
A pointed crown, high white collar and dark cape distinguish Snow White’s queen.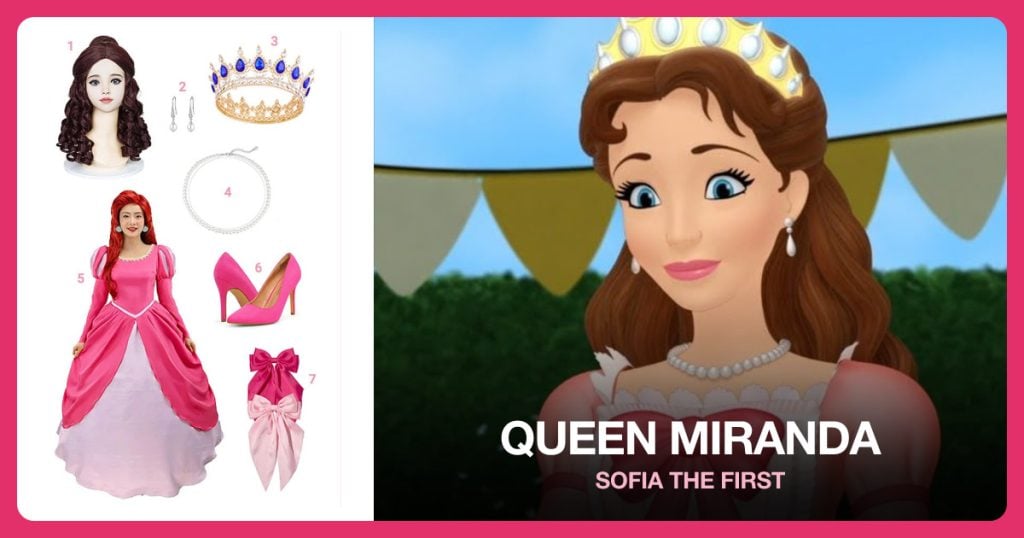
Queen Miranda
Miranda’s pink gown, jeweled gold crown and pearls create the Sofia the First royal look.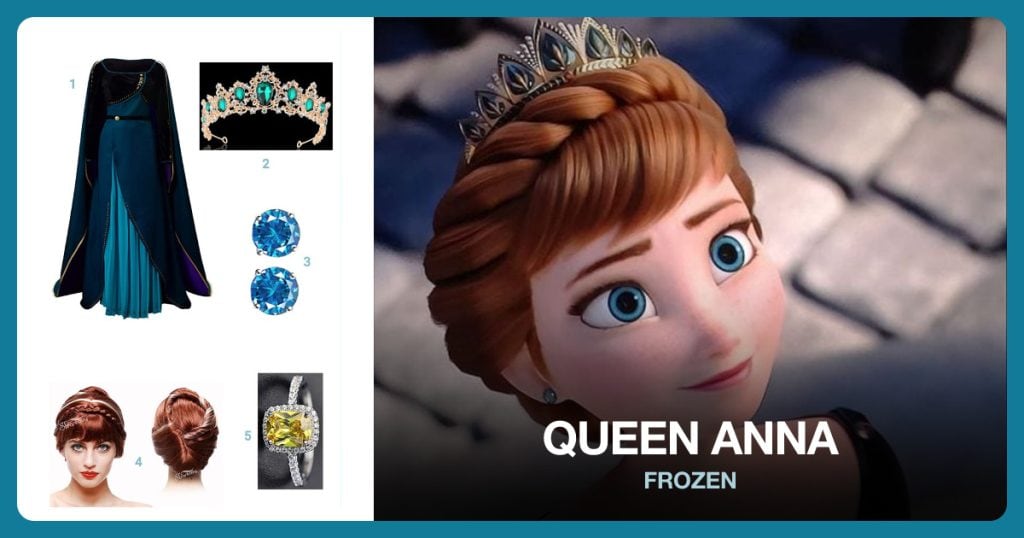
Queen Anna
Anna’s coronation gown and green tiara follow her Queen of Arendelle outfit from Frozen II.
Queen Iduna
Iduna’s purple patterned royal dress, braided hair and blue pendant offer a softer Frozen-inspired queen outfit.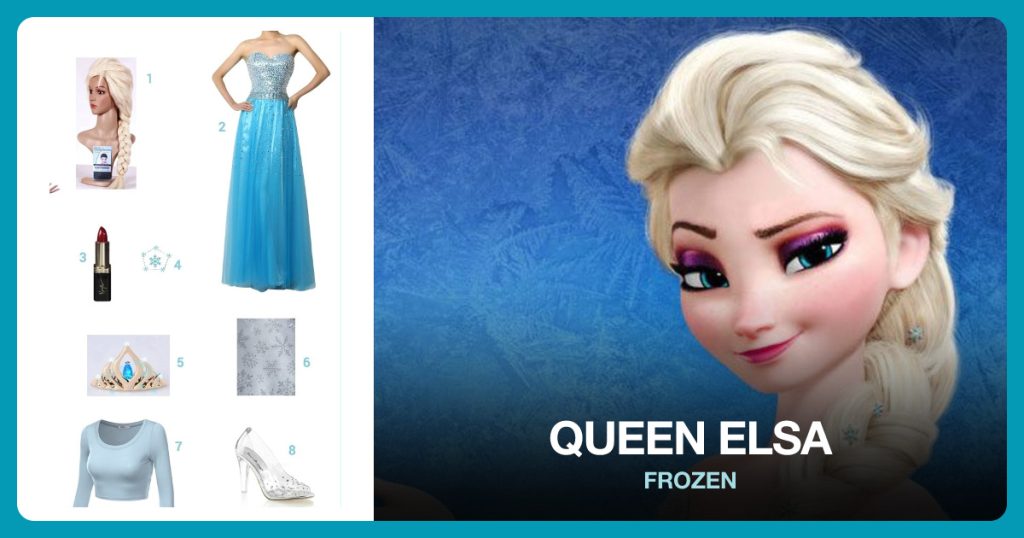
Queen Elsa
Choose Elsa’s sparkling blue ice dress and blonde side braid for the Snow Queen look. This is her ice-gown version, not a coronation outfit.What Do You Need for a DIY Queen Costume?
Choose one long dress
Set out one floor-length or ankle-length dress in burgundy, royal blue, black or white. Velvet gives the burgundy look depth, a sleeveless V-neck style suits the blue ballroom version, a one-shoulder gown creates drama for black, and a ruched white maxi dress makes a softer formal base. Pick the one that fits your comfort and coverage needs.
Add practical flats
Use gold flats for the burgundy, blue or white looks, or black flats for the dark look. Flats keep the costume easier to walk in than formal heels, especially with a long hem. Wear a pair you can stand in comfortably and make sure the dress does not catch beneath the toe.
Keep crown and cape separate
Choose a lightweight gold costume crown or tiara as the clearest royal detail. A red velvet robe can stand in for a ceremonial cape, while a purple velvet cloak creates a darker variation. Neither cape is essential, and the red robe may not include the white faux-fur trim often associated with royal costume capes.
Set out optional royal details
Use one long faux-pearl strand for the blue or white looks, a stretch gold waist belt for the white dress, and a lightweight gold plastic scepter for a ceremonial pose. The scepter is a costume prop rather than a functional item. Keep accessories on a chair or table so you can test them after the dress is on.
How to Make a Queen Costume, Step by Step
Start with the clothes, fit the identifying details and check the finished outfit before you leave.
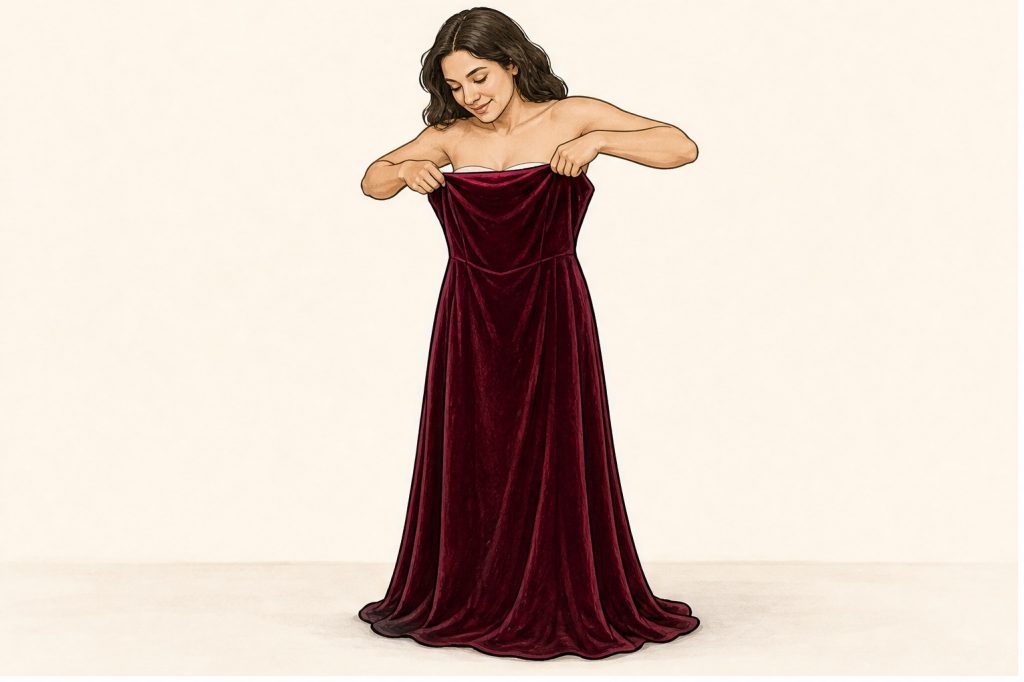
1. Put on the burgundy dress
Start with the burgundy dress or substitute the dress chosen for your version. Smooth the fabric at the waist and hips, then check that the neckline sits evenly. If you are using a dress with a slit, adjust it so you can take a natural stride without needing to hold the skirt closed.
Try the dress with any supportive layers or undergarments you plan to wear for the event. A queen costume should feel polished, not restrictive. If the hem pools heavily, choose a shorter long dress, alter the styling with a belt, or switch to a pair of shoes that gives enough clearance.
Check: The dress hangs comfortably, the hem clears the floor, and you can walk across the room without stepping on it.
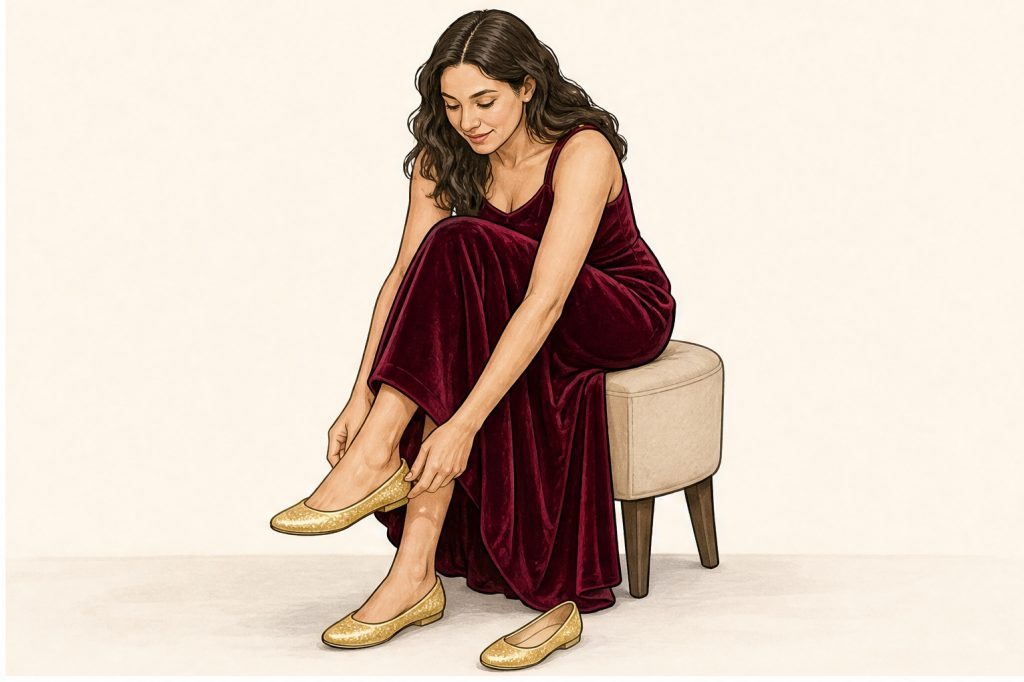
2. Step into gold flats
Put on gold flats for a warm royal finish, or use black flats for the dark velvet queen. Stand upright and check the dress length again once your shoes are on. Flats are especially useful when you will be moving around, standing for photos or managing a cape during a party.
Walk several steps on the surface where you expect to wear the costume. If the dress catches at the front, gently lift the skirt while walking or select a slightly shorter dress. Avoid adding unfamiliar high heels simply because the costume is formal; steady movement looks more regal than difficult footwear.
Check: You can walk, turn and sit without the hem tangling around your shoes.
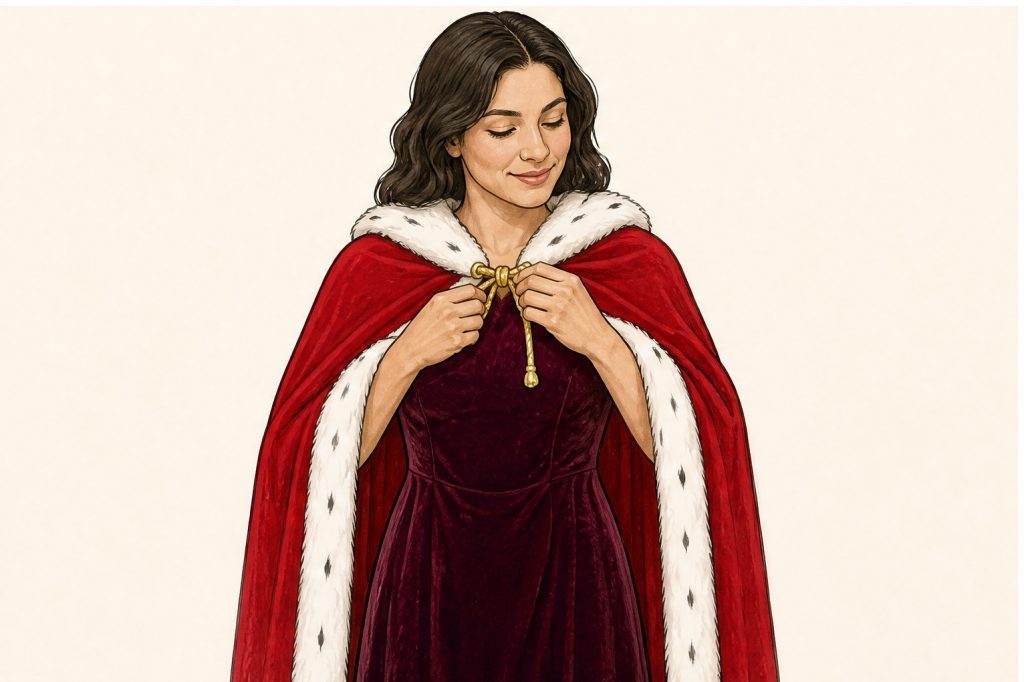
3. Fasten the royal cape at the shoulders
Drape the red or purple cape over your shoulders only after the dress is settled. Center the collar or neckline at the back of your neck, then close or tie it loosely enough that you can turn your head. Let the cape fall behind the dress rather than pulling it forward over the bodice.
A cape creates a different layer from the crown: the cape broadens the shoulder line and adds movement, while the crown identifies the role from the front. Skip the cape if the venue is warm, crowded or likely to catch trailing fabric. A pearl necklace is a lighter alternative for the blue or white looks.
Check: The cape stays centered when you raise your arms and its length does not drag where people may step on it.
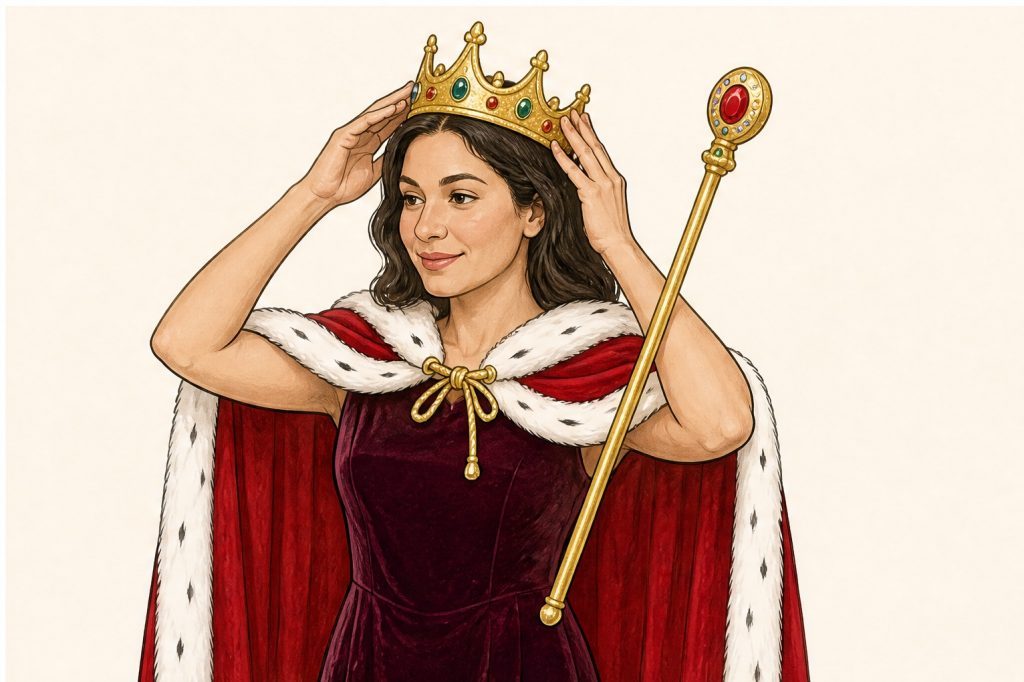
4. Place the gold crown securely
Set the gold crown or tiara slightly behind your hairline, where it can rest against a stable section of hair instead of sliding onto your forehead. Check the front in a mirror, then add the optional pearl necklace, waist belt or scepter after the crown feels secure.
Use discreet hairpins that match your hair color if the crown has loops or a band that can accept them. The crown is its own accessory, so do not rely on a cape hood or high collar to hold it in place. Carry the scepter loosely and set it down whenever it becomes inconvenient.
Check: The crown remains level when you look down, turn your head and take a few normal steps.
Queen Hair, Crowns & Finishing Touches
Keep the finishing touches focused on the royal accessories. A secure crown, a hairstyle that leaves the face visible and one or two deliberate jewelry choices will read more clearly than elaborate makeup or too many competing costume pieces.
Build a crown-friendly hairstyle
A low bun, half-up style, braid or your usual short hairstyle gives a crown a stable place to sit. The video, “How to create a sleek bun with headpiece placement” by Bella Nella, is useful specifically for its optional updo and tiara-placement method. You do not need the full bridal hairstyle; use only the placement idea that helps your crown stay secure.
Match jewelry to the dress
Use pearls with the blue ballroom or white-and-gold looks for a soft court effect. Let the burgundy velvet dress carry its own richness, or pair it with the crown and cape only. For the black and purple look, keep jewelry minimal so the one-shoulder neckline and cape remain the strongest features.
Make the crown visible
Place the crown where it can be seen from the front rather than hiding it in a very high hairstyle or under a cape hood. If it is a lighter tiara rather than a full crown, secure it with pins and keep the rest of the hair smooth enough that the gold shape remains distinct.
Use a cape as an optional project
The basic looks need no sewing. If you want a more theatrical cape later, you can add removable trim, a decorative clasp or a contrasting collar as an optional craft project, but the dress and crown already establish the costume. Avoid permanent changes to clothes you want to wear again.
Four Queen Outfit Ideas
Choose one starting point and reuse the clothes you already have. Each card keeps its suggested shopping pieces together; photo styling and the linked alternatives may differ.
Burgundy Royal Queen
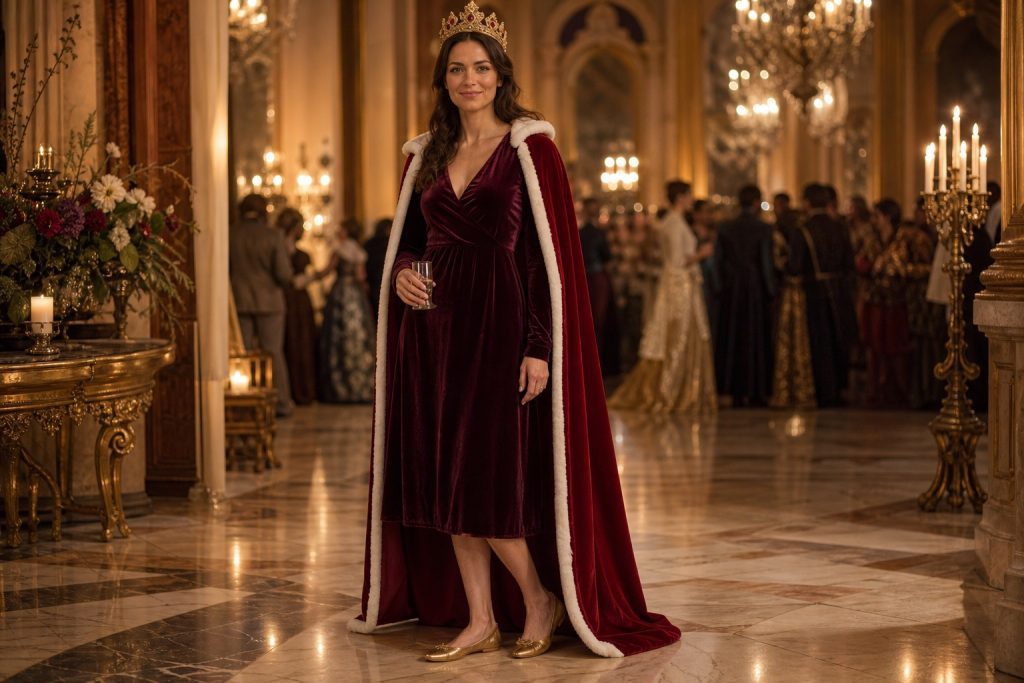
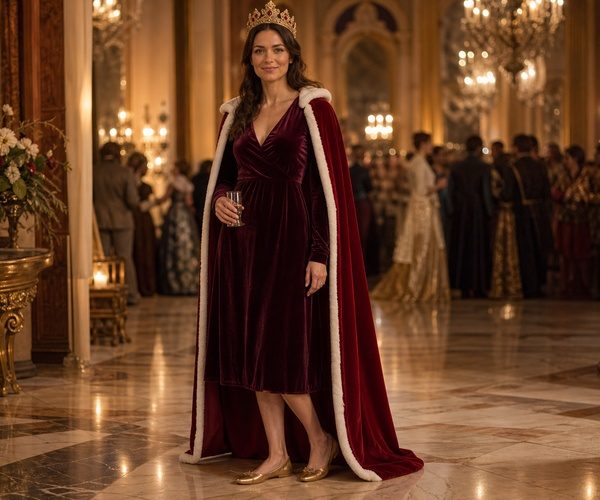
Wear a burgundy velvet midi dress with gold flats, a red royal cape and a jeweled crown. The cape adds a ceremonial outline without needing an elaborate gown. Keep its front open to show the dress, and carry a lightweight scepter if you want an extra royal detail.
Shop This Outfit
Amazon · Items sold separately
 Gold Ballet Flats
 Red Velvet Royal Robe
 Gold Queen Tiara
Blue Ballroom Queen
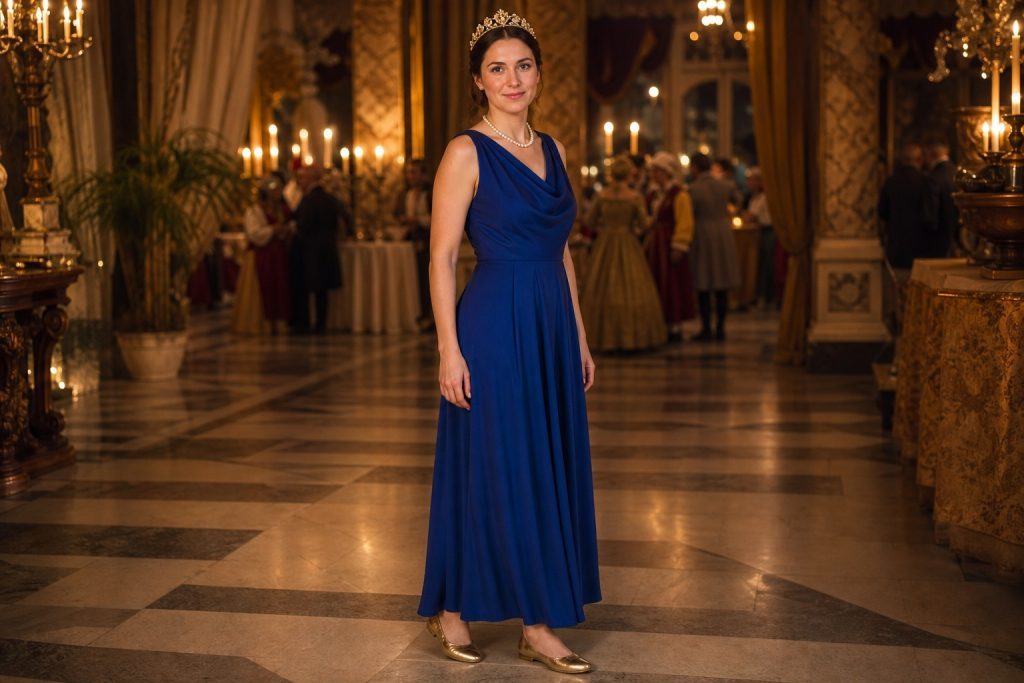
Start with a royal-blue evening dress and gold flats, then add a gold crown and pearls. Leaving off the cape lets the draped neckline and blue color stand out. Wear one pearl strand or layer a long necklace, keeping the crown as the clearest royal feature.
Shop This Outfit
Amazon · Items sold separately
 Long Faux Pearl Necklace

Dark Velvet Queen
Pair a black evening gown with a short purple velvet shoulder cape, black flats and a gold crown. The one-shoulder neckline adds contrast beneath the cape. Carry a gold costume scepter for a dramatic queen, or leave your hands free and let the purple-and-black palette set the mood.
Shop This Outfit
Amazon · Items sold separately
 Black Ballet Flats
 Purple Velvet Short Cape
 Gold Plastic Royal Scepter
White and Gold Queen
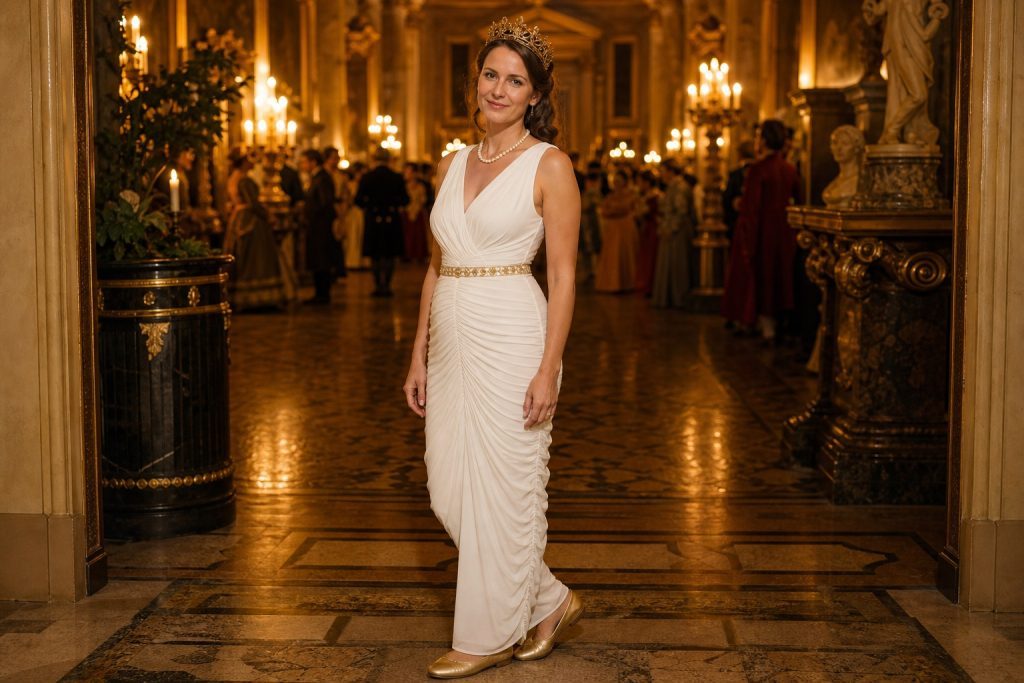
Use a white long dress as the base, then repeat gold in the waist belt, flats and crown. Add a pearl necklace for a softer finish. This version works with a simple summer dress as well as an evening gown, provided the crown and belt stay clearly visible.
Shop This Outfit
Amazon · Items sold separately
 Gold Cinch Waist Belt
Ready-Made Queen Options
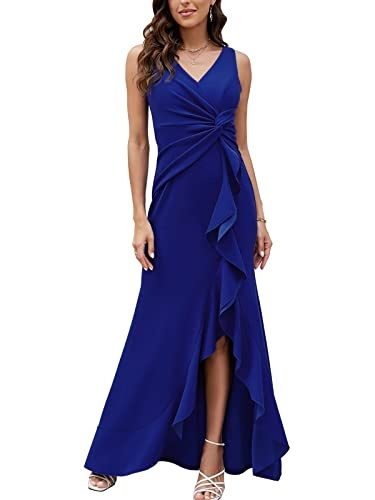
These are starting pieces, not complete outfits. Check the selected size, color and package contents, then add only the details your chosen look needs.


Quick Fixes for Your Queen Costume
The costume reads as a formal guest
Make the crown the first visible accessory, then add one unmistakably royal detail such as a cape, scepter or gold waist belt. A long dress alone can look like ordinary eveningwear; the crown and a deliberate color story make the queen role much clearer.
The crown slips forward
Move it slightly farther back from the forehead and anchor it into a bun, braid or thicker section of hair. Use small pins through any available loops, and test the fit while looking down. Do not overtighten a headband-style crown until it causes a headache.
The cape feels bulky or too warm
Remove it and use the crown with pearls, a belt or a scepter instead. A cape is a dramatic optional layer, not the only way to look royal. For a shorter event, wear it for an entrance or photos and set it aside afterward.
The long skirt catches underfoot
Choose flats with a smooth toe, lift the front of the skirt slightly on stairs and avoid standing on the cape hem. If you have another dress option, prioritize one that clears the floor. Comfortable movement is more useful than a dramatic length that prevents walking.
How to Act Like a Queen
A queen costume needs only a few calm, composed gestures. Keep the performance light and let the crown, dress and posture carry the idea.
Stand with quiet authority
Keep your shoulders relaxed, chin level and hands still at your sides or lightly around the scepter.
Offer a gracious greeting
Use a small smile, a nod or a brief wave rather than exaggerated royal commands.
Pose with the cape
For a photo, turn slightly and let one hand guide the cape outward without pulling it tight.
Queen Couples & Royal Groups
A royal group works best when every person chooses one distinct role or color direction. Repeat gold crowns, jewel tones or pearl details to connect the costumes, while leaving enough variation that each outfit remains easy to recognize in a photo.
A court of queens
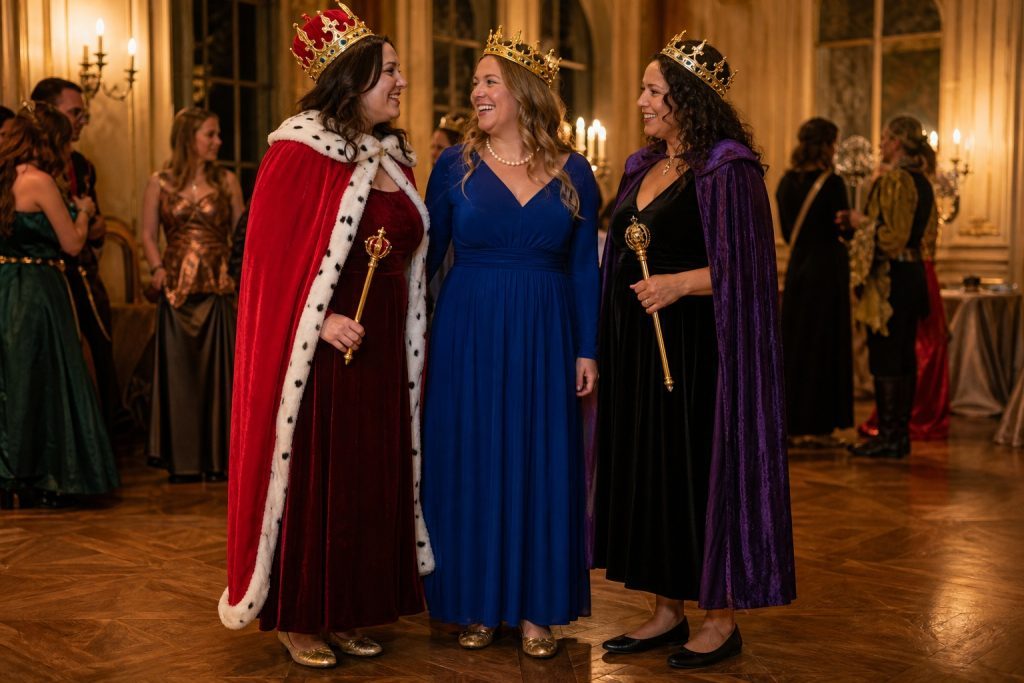
Use burgundy, blue, black-purple and white-gold as four separate queen looks. Give each person a crown, then vary the accessories: one wears a cape, one pearls, one a belt and one carries a scepter. This makes the group coordinated without requiring matching dresses.
Queen and royal companion
One person can wear the queen dress and crown while another uses formal dark clothing, a simple cape, a crown or headpiece, and a lightweight prop. The companion does not need to match the queen exactly; a shared gold accent or cape color is enough to establish the pair.
Storybook royalty mix
Combine a generic queen with a king, prince, princess, court magician or royal adviser using clothes everyone can move in. Keep the queen’s crown and long dress visually strongest. A shared palette of gold, burgundy, purple or pearl white helps the group look intentional without invented uniforms.
Queen Costume Tips & FAQs
What details make a queen costume recognizable?
A crown and a long formal dress do most of the work. Add a cape, pearl necklace, gold belt or lightweight scepter if you want a more ceremonial version. The crown should remain visible from the front, because it distinguishes a queen costume from ordinary eveningwear.
Do I need both a crown and a cape?
No. The crown is the clearest royal identifier, while the cape is an optional dramatic layer. A blue or white long dress with a crown and pearls can look complete without a cape. If you use a cape, choose one that does not make you too warm or restrict your movement.
Which dress shape is most comfortable for a party?
Choose the silhouette you can walk and sit in easily. A velvet maxi dress feels rich and covered, a sleeveless V-neck dress creates a ballroom effect, a one-shoulder gown looks dramatic, and a ruched maxi can be softer and more flexible. Check the hem with your intended shoes before leaving.
Can I make a queen costume from existing clothes?
Yes. Start with any long solid-color dress, formal skirt and top, or comfortable robe-like layer. Add costume jewelry, a simple gold headpiece and flats you already own. A scarf or wrap can suggest a cape, and a belt can help define the waist without purchasing a full costume.
How can I keep the costume comfortable in a crowded venue?
Choose flats, avoid a cape that drags, and keep the crown light enough to wear for more than a few minutes. Bring only one handheld prop, if any, and set it down during meals or activities. A crown with a simple dress and pearl necklace is often easier than multiple layers.
Should I use a scepter?
A gold plastic costume scepter is useful for photos and makes a ceremonial queen look especially clear, but it is optional. Carry it loosely rather than treating it as a walking stick, and leave it aside when it becomes cumbersome. The crown and long dress still communicate the costume without it.
About Queen Costumes
Queen costumes are flexible because they rely on broad visual signals rather than one fixed uniform. A crown, formal dress and restrained gold or pearl accessories can suggest ceremonial royalty in a way that works for parties, theater themes and group costumes. Color changes the mood without changing the basic construction.
Build around a wearable base
A dress you can comfortably walk, sit and dance in is more useful than a costume assembled around difficult accessories. Start with the long dress and shoes, then add the crown. Capes, belts, pearls and scepters are finishing choices that can be removed if they stop being practical.
Use color to define the character
Burgundy and red feel ceremonial, royal blue feels bright and formal, black with purple creates a darker courtly mood, and white with gold feels luminous. These are costume styling choices rather than claims about historical dress. Pick the palette that suits your event and the clothes already available to you.
Make the Queen Costume Yours
Choose one dress color story, make sure the hem works with your flats, and secure the crown before adding anything else. A cape, pearls, belt or scepter can refine the look, but they are optional. Once you can move comfortably and the crown stays level, your queen costume is ready.