









A pair of walking gingerbread cookies. A snack machine with someone inside. A dress painted to look like Hogwarts. These are the kinds of costumes that make you stop scrolling and wonder how someone came up with them.
We picked 20 real submissions from Costume Wall’s 2019 contest archive, with original photos and a useful detail to borrow from each. You’ll find solo characters, clever pairs, family outfits, and ambitious handmade creatures. Some start with ordinary clothes; others are substantial craft projects.
Browse for the idea that suits what you enjoy making: a funny object, a favorite character, dramatic makeup, or a large prop. Each entry links to its submitter’s account, and relevant costume guides give you another way to assemble the clothes.
Choosing a whole cast for your household? Our family costume article focuses on that decision. This list is about creative individual outfits and inventive builds as well as coordinated groups.
1. Bob Ross and His Happy Little Painting
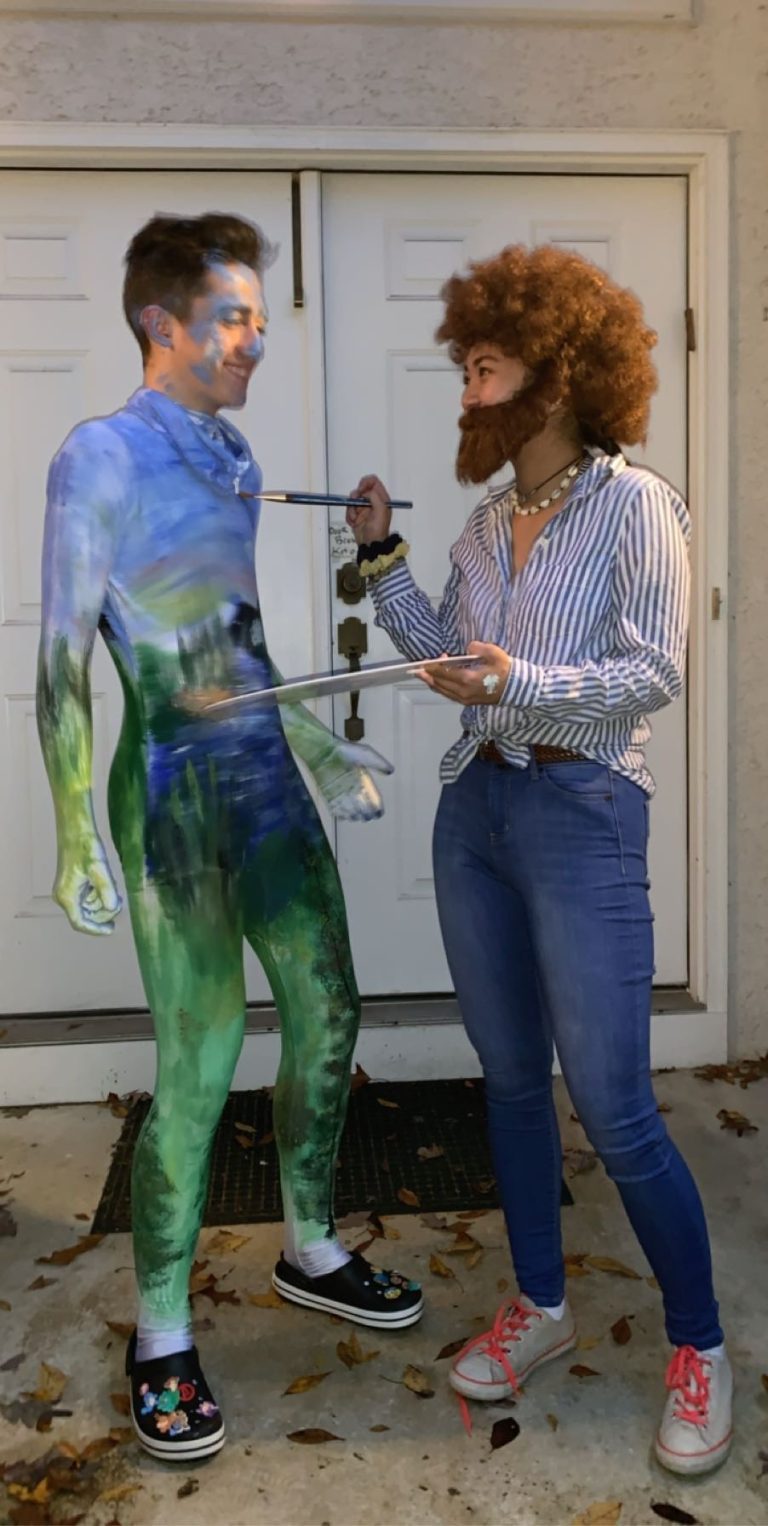
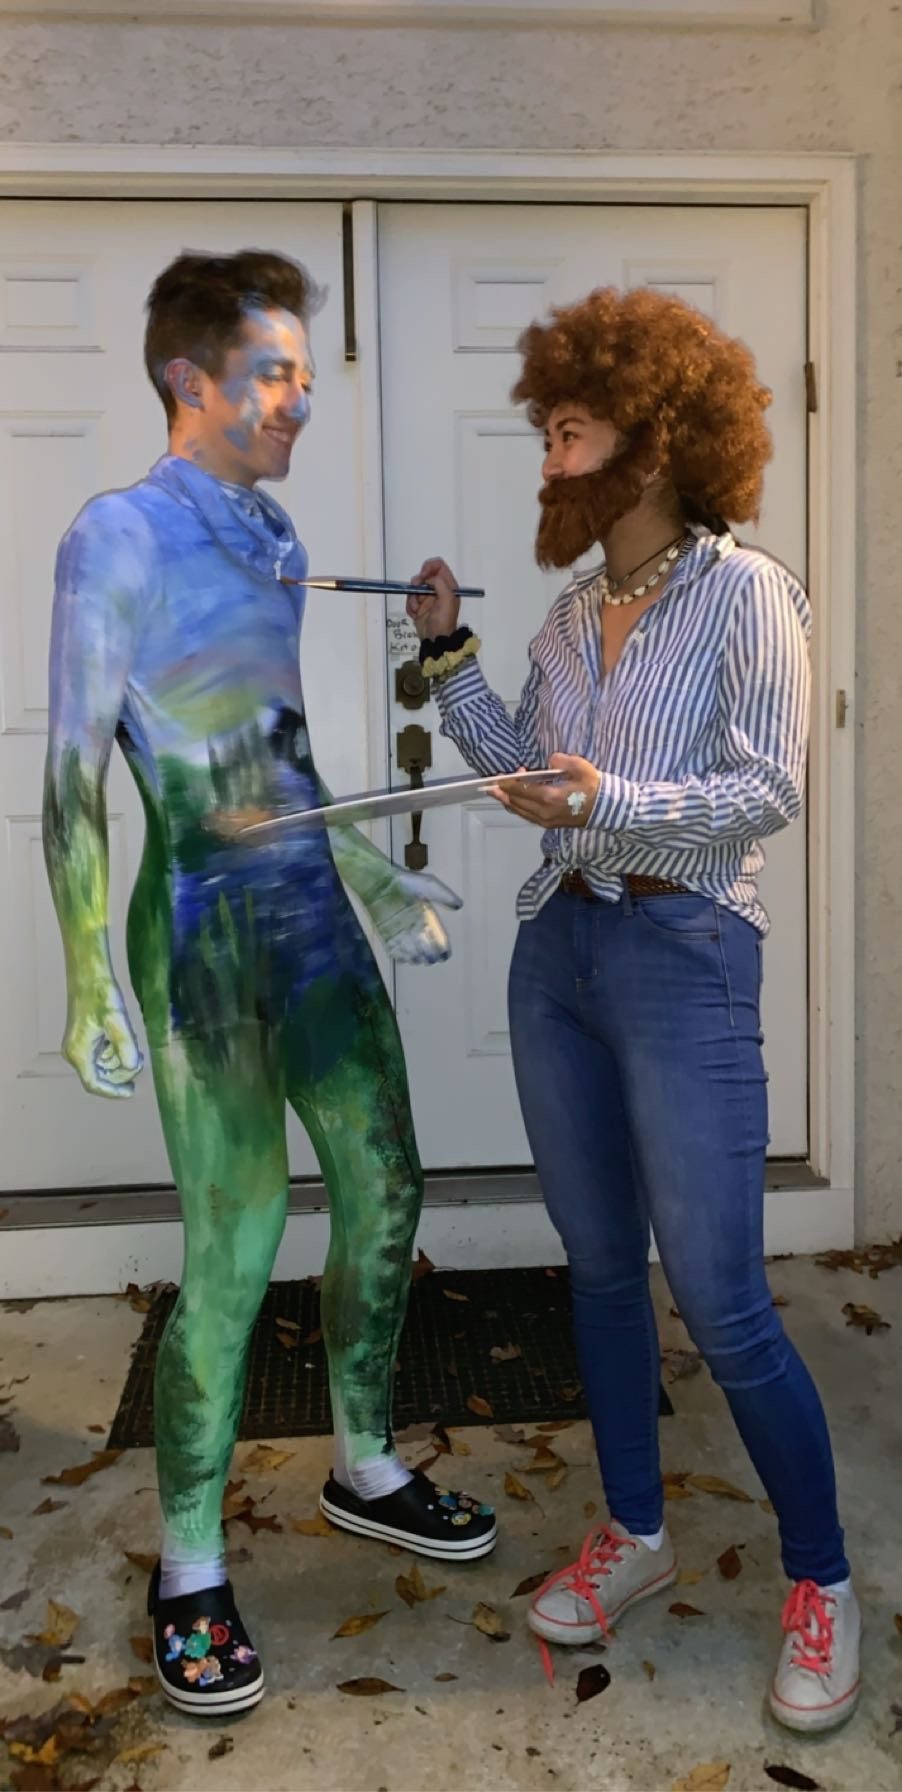
One friend becomes the painter; the other becomes the painting. Jade Boden’s photo pairs a curly wig, beard, blue shirt, jeans, and palette with a landscape painted across a white bodysuit. The brush between them turns the pose into part of the joke. You don’t need matching clothes when the two roles explain each other this clearly.
Jade’s original account describes painting the landscape onto the garment using a Bob Ross reference. The useful idea is the artist-and-artwork pairing. Your canvas could instead be a painted apron, a framed picture, or a lightweight picture panel carried by the second person.
Keep the artist’s clothes familiar and give the painting one strong subject: mountains, trees, or a sunset. Photograph the pair together with the brush pointing toward the artwork. That little interaction does more for the costume than adding extra props to both people.
Photo and entry submitted by Jade Boden. View the original Bob Ross and His Happy Little Painting entry.
 Make this costume
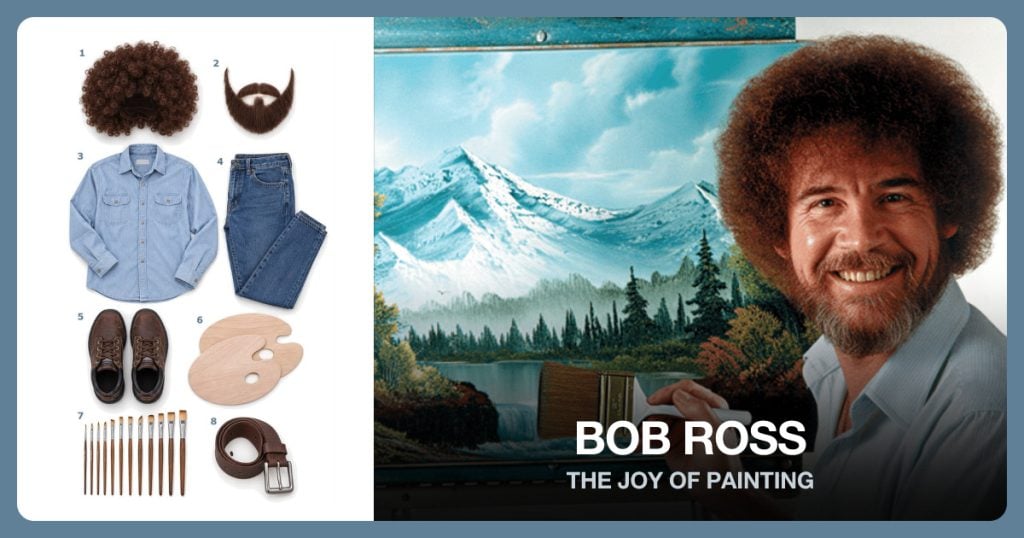
Bob Ross
See the outfit, supplies and step-by-step guide.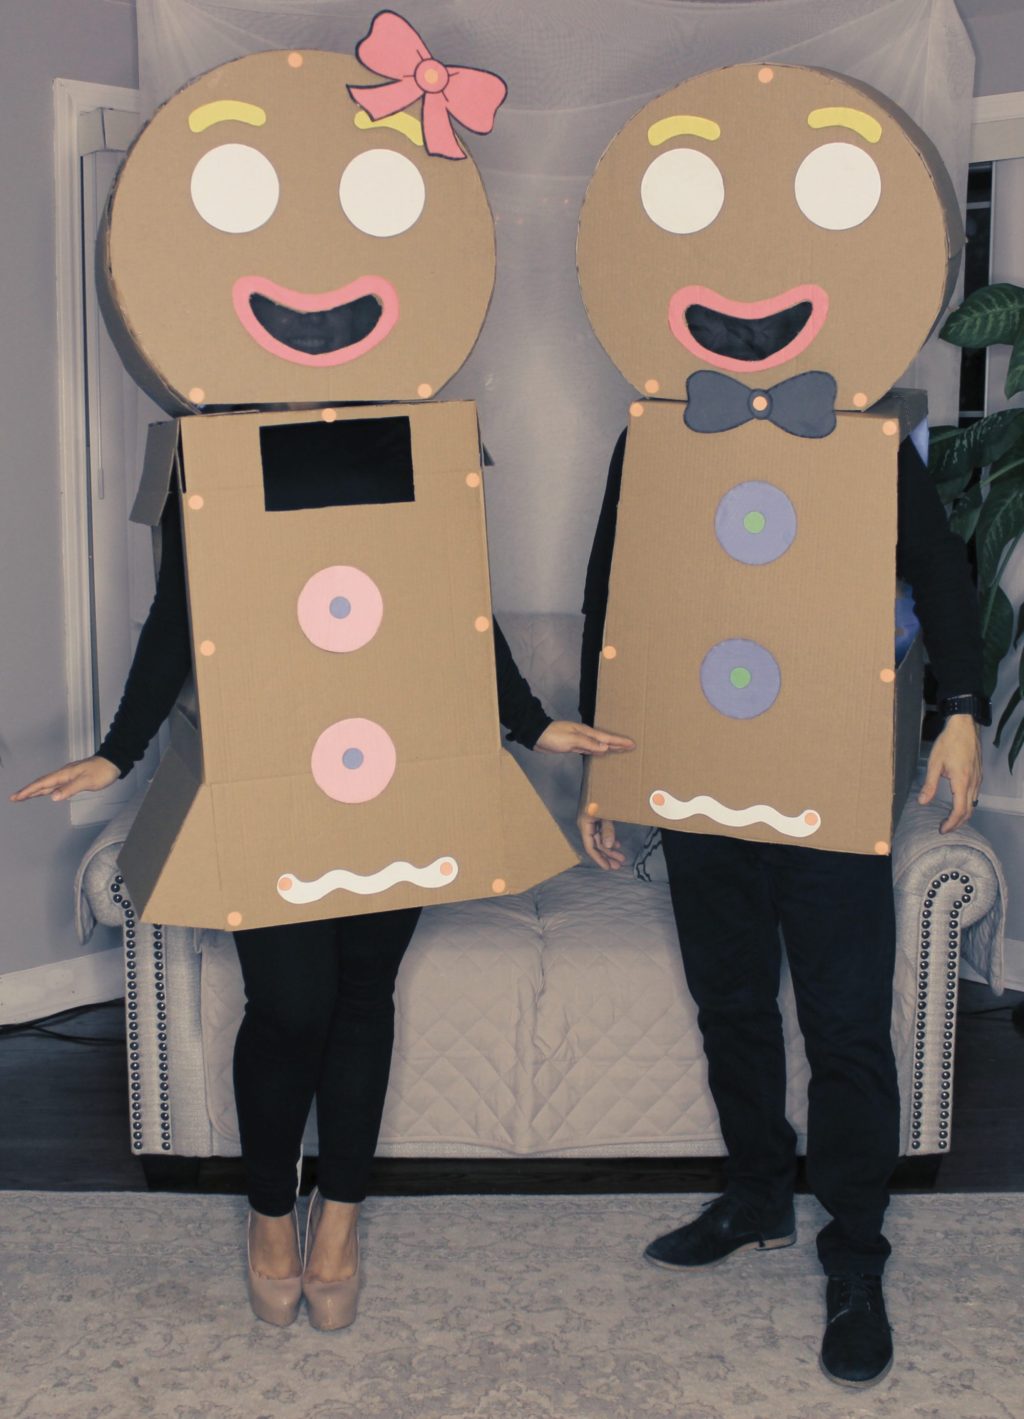
2. Homemade Gingerbread Cookies
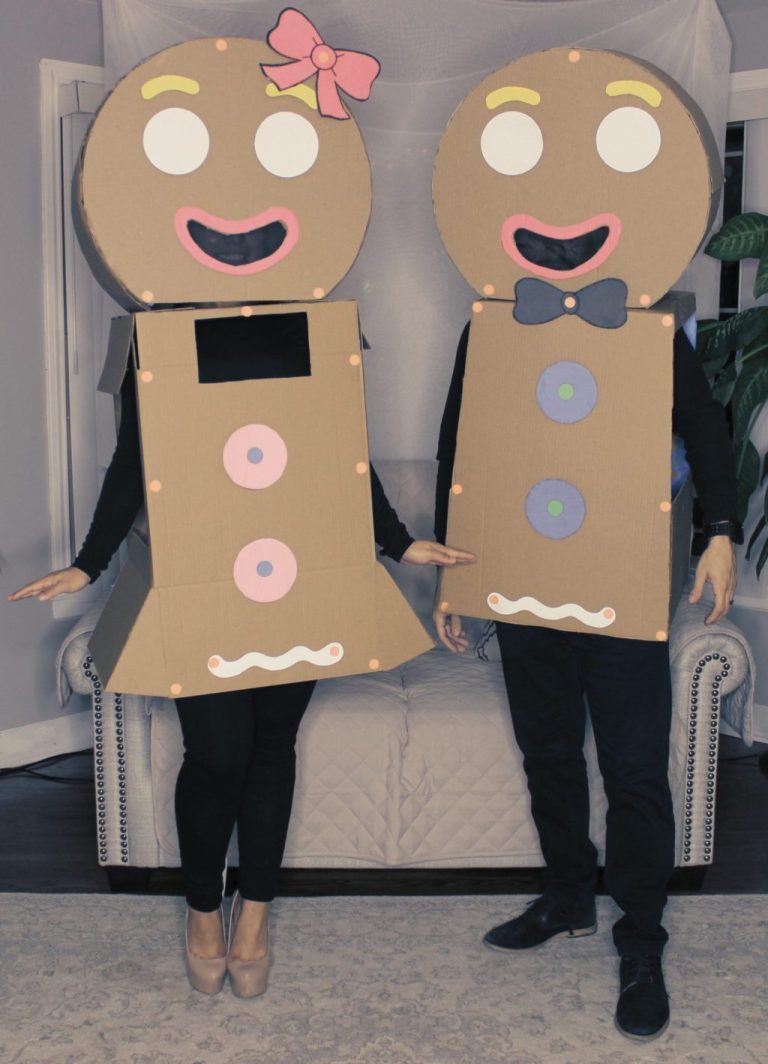
Rocio’s gingerbread pair looks as though two cookies walked straight off a baking tray. Large smiling heads, brown bodies, white icing lines, and colorful buttons do the work. One cookie has a bow on its head; the other has a bow tie. Those small differences give each person a distinct look while keeping the pair coordinated.
The submission calls these homemade costumes, but doesn’t provide a construction tutorial. Look closely at the photo for the design decisions: the pale eyes and icing stand out against the brown shapes, and the faces are much larger than the decorative buttons.
For your own version, decide whether you want a wearable cookie outline or a simpler brown outfit decorated like gingerbread. Keep the icing pattern big enough to see in a group picture. This also expands neatly beyond two people: each cookie can have a different expression or icing design.
Photo and entry submitted by Rocio. View the original Homemade Gingerbread Cookies entry.
3. A Washer, Dryer, and Laundry Crew
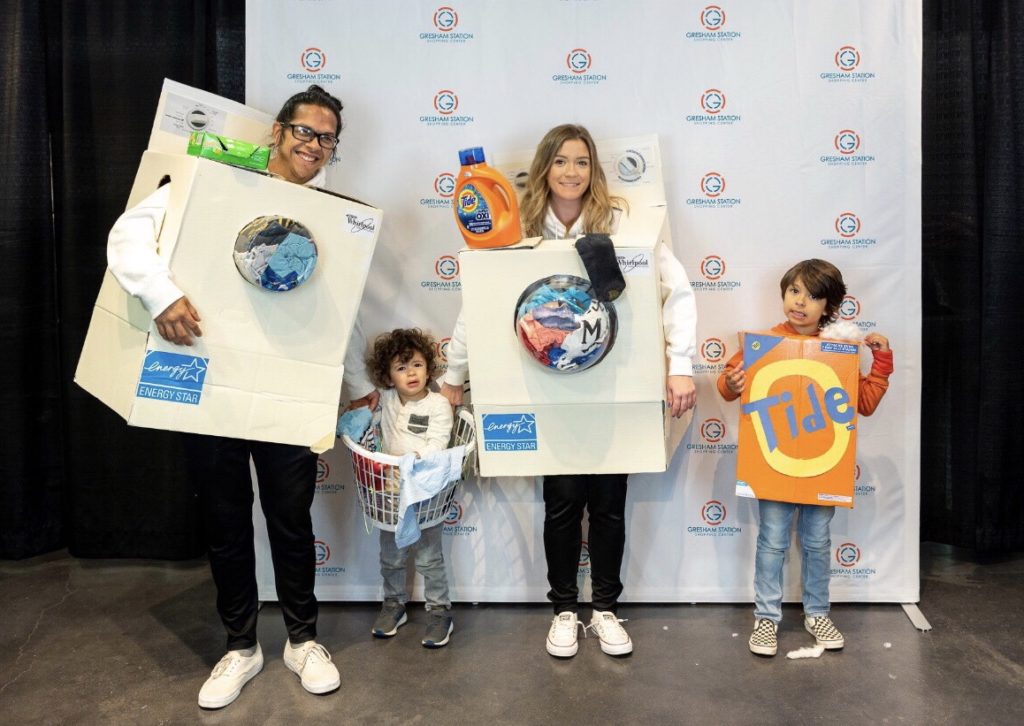
Amber’s photo turns a household chore into a four-person costume. Two people wear white washer-and-dryer fronts, while the other two become a detergent box and a laundry hamper. The orange box breaks up the white appliances, and the clothes in the hamper make the whole lineup feel connected.
The round appliance doors are the detail to notice. They identify the machines before you read a label. The smaller costumes are equally useful: they let the group include different shapes instead of asking everyone to wear another large box.
Borrow the way the roles fit together. If you have two people, the washer and dryer make a natural pair. With more people, add the objects that belong in the same room. Sketch everyone’s role together before building so the main colors and proportions work as a group, even when the costumes require different amounts of making.
Photo and entry submitted by Amber. View the original A Washer, Dryer, and Laundry Crew entry.
4. Snack Attack Vending Machine
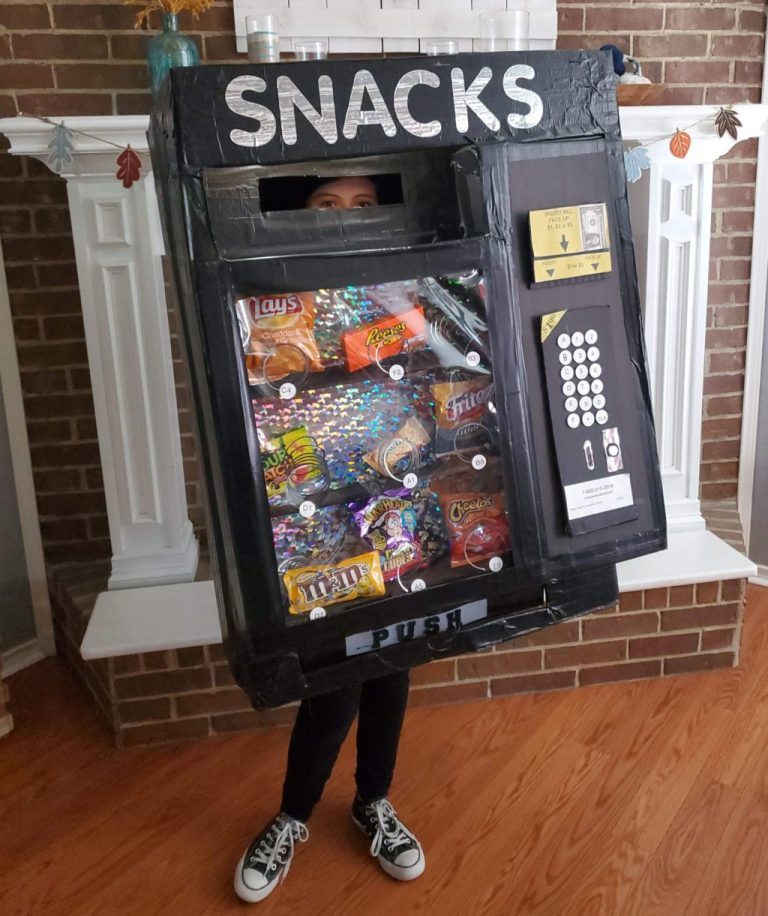
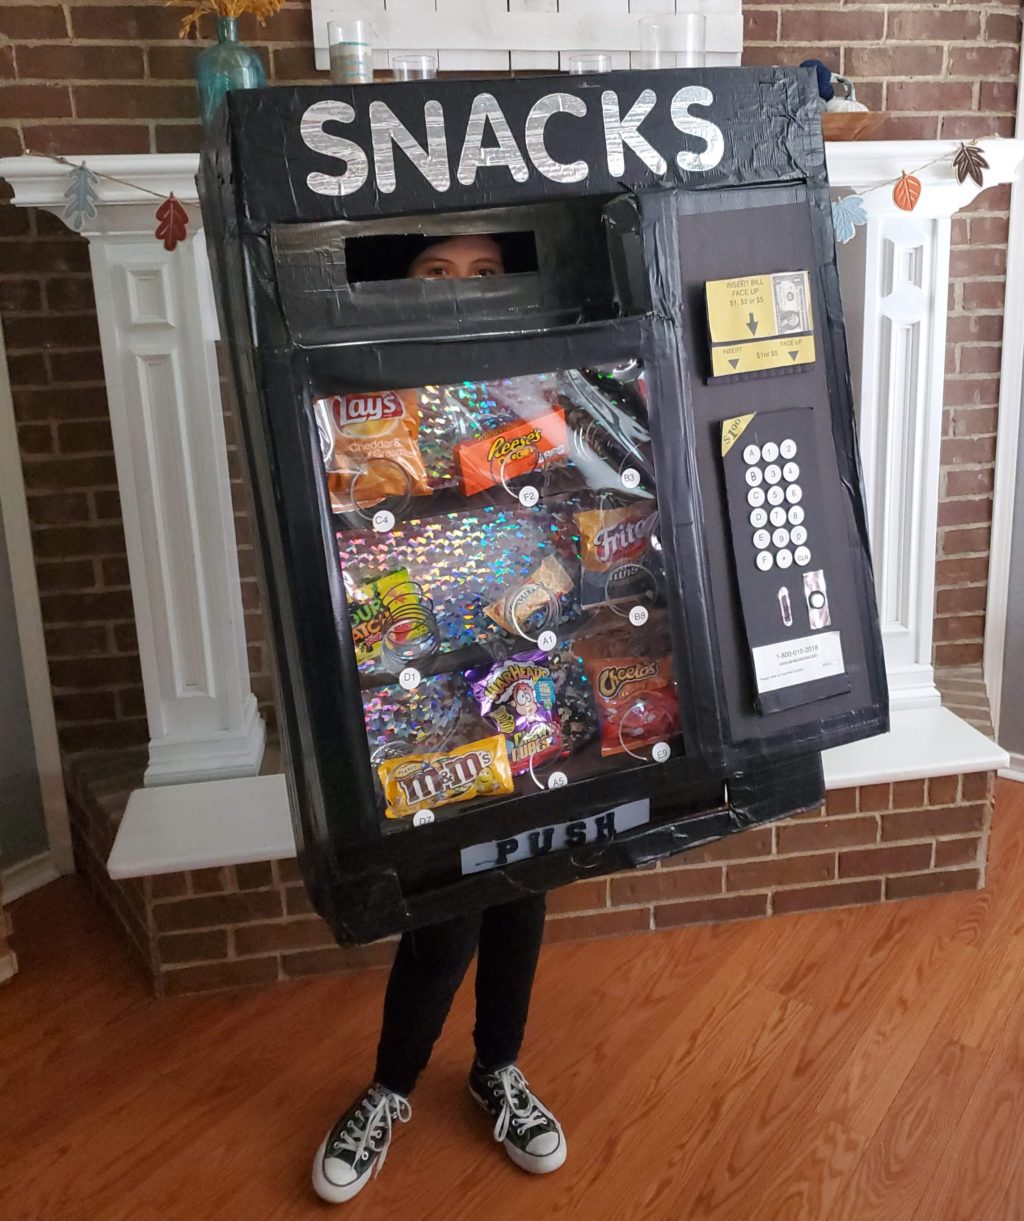
Melissa Ramos’s vending machine has a clear front, rows of snack packets, a keypad, and a big SNACKS sign. The wearer peeks through a slot near the top. It’s an ordinary object made funny by its new location: walking around the house instead of standing against a wall.
Melissa lists cardboard, duct tape, a slinky, clear poster board, and empty snack bags among the materials. The empty packaging is the clever shortcut. It supplies recognizable colors and shapes without filling the costume with the weight of actual snacks. Her account also describes lights inside the box.
Give the front panel most of your attention: a few neat rows, a visible selection area, and one dispensing slot tell the story. If a whole box isn’t your preferred outfit, adapt the same design into a decorated front panel. Choose packets with different colors so the display reads as an assortment.
Photo and entry submitted by Melissa Ramos. View the original Snack Attack Vending Machine entry.
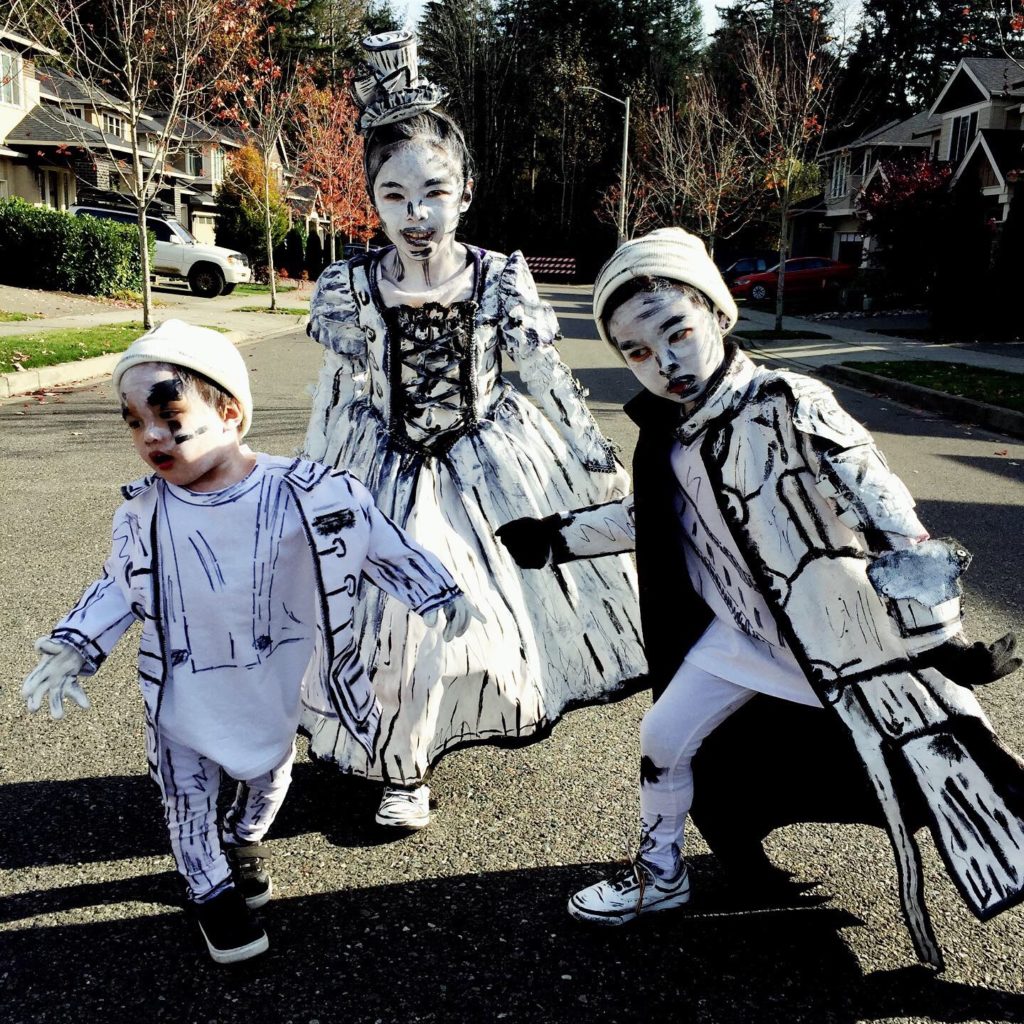
5. Sketchbook Characters in the Real World
Jayne Soterakopoulos’s three children look drawn rather than dressed. Black lines trace white collars, pockets, folds, and garment edges. Each outfit has a different shape, yet the repeated drawing treatment makes them feel like characters from the same sketchbook. The colorful outdoor background strengthens that illusion.
Jayne’s account describes secondhand clothes and accessories painted in black and white. The photo shows why choosing a common technique can be more useful than choosing identical outfits. A dress, a coat, and a shirt can all belong together when their outlines use the same visual language.
Start with the largest garment edges, then choose a few folds or pockets to emphasize. Keep the marks confident and consistent across the outfits. Test garment paint on a spare piece of the fabric before committing to the whole look; face products are a separate part of the styling, not a substitute for clothing paint.
Photo and entry submitted by Jayne Soterakopoulos. View the original Sketchbook Characters in the Real World entry.
Make the joke readable
The cookies, laundry crew, and vending machine all use big shapes first. Keep the main outline and one defining detail clear before adding tiny labels or decorations. A photo taken across the room is a useful way to see what gets lost.
Choose a role, then a shape
An object costume can work as a box, a front panel, or details added to clothes. Choose the form you actually want to wear. For a duo, give the second person a complementary role rather than making a second copy automatically.
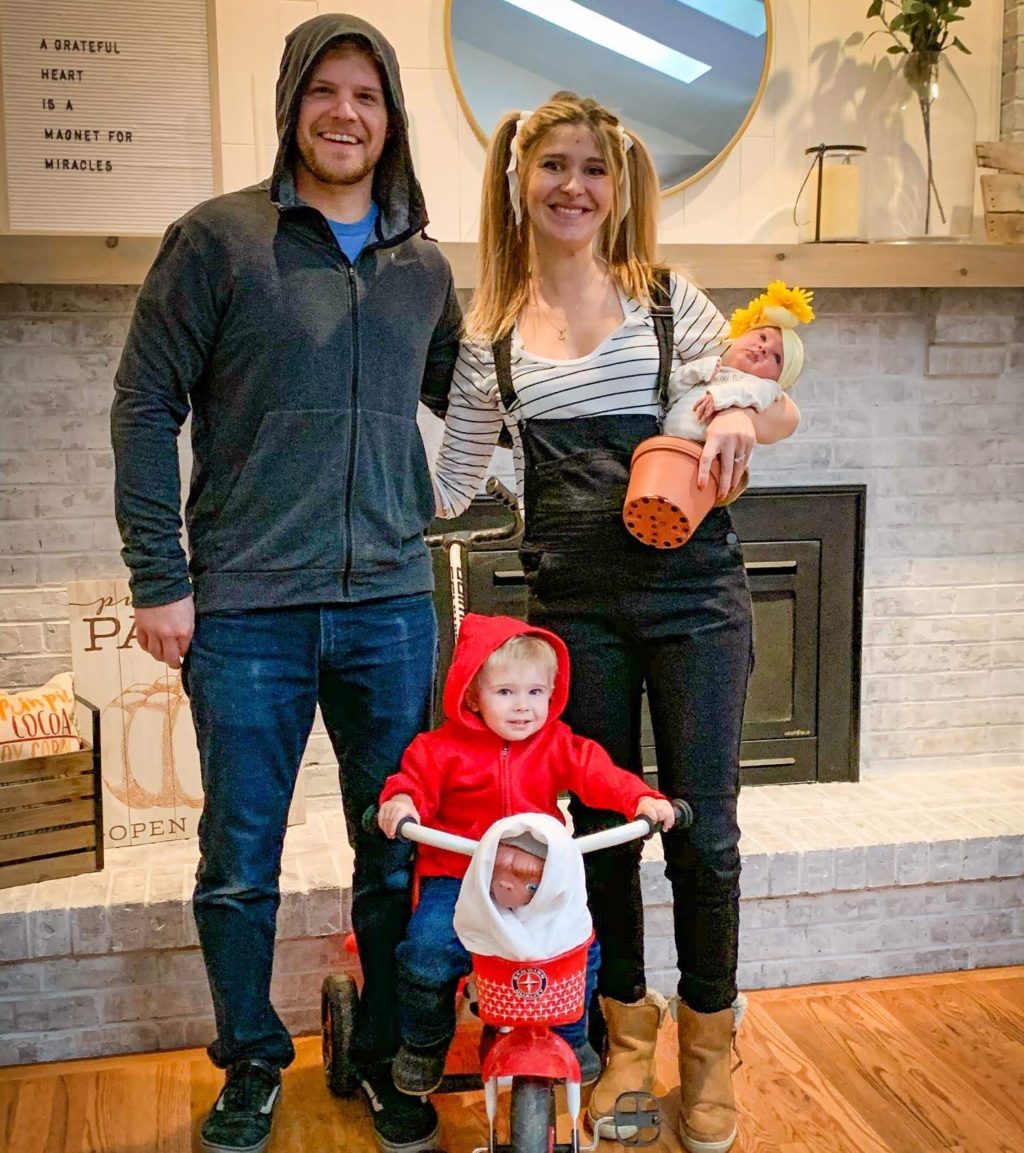
6. E.T., Elliott, and the Family
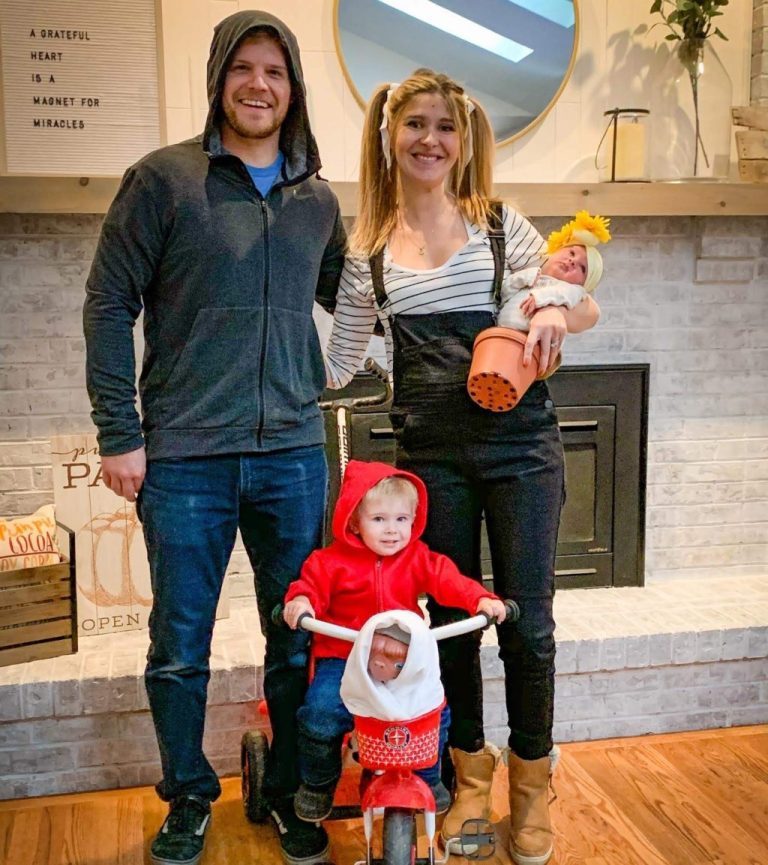
Bianca Longino’s family photo combines Elliott’s red hood and bicycle with Michael, Gertie, and a baby dressed as a flower pot. The basket carries E.T., giving the smallest bicycle a starring role. There are two adults and two children in the picture, with different outfits that still belong to one film.
The flower pot is a particularly thoughtful choice. It gives the youngest participant a role in the theme without requiring another full character outfit. Meanwhile, Gertie’s overalls and Michael’s hoodie help fill out the family around the instantly recognizable red hood.
Choose the role someone is most excited to wear, then work outward. For a duo, Elliott and the basket companion already make a clear idea. For a family, borrow additional characters or objects from the same story. The guide below helps with the red-hood outfit; the original entry shows how Bianca expanded it into a complete family picture.
Photo and entry submitted by Bianca Longino. View the original E.T., Elliott, and the Family entry.
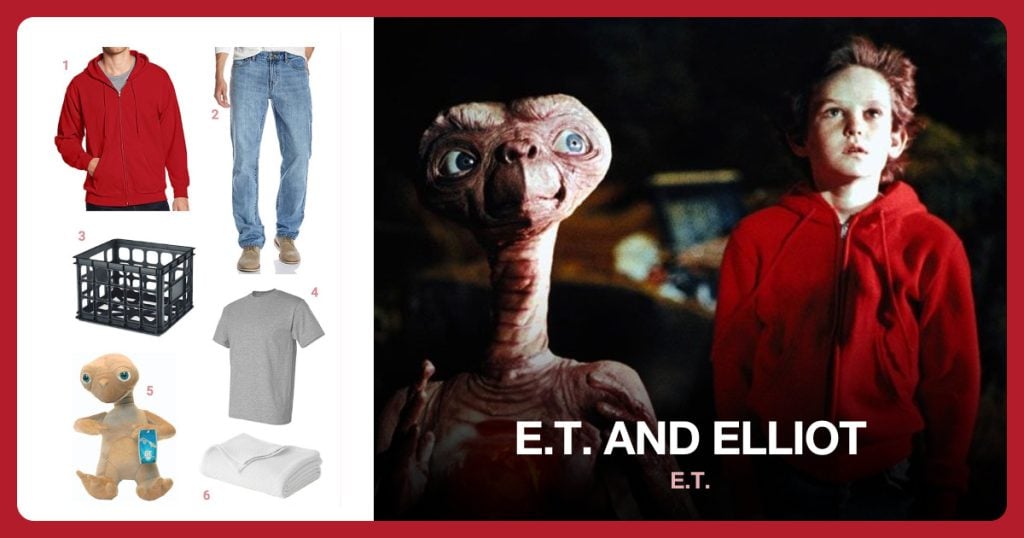 Make this costume
E.T. and Elliot
See the outfit, supplies and step-by-step guide.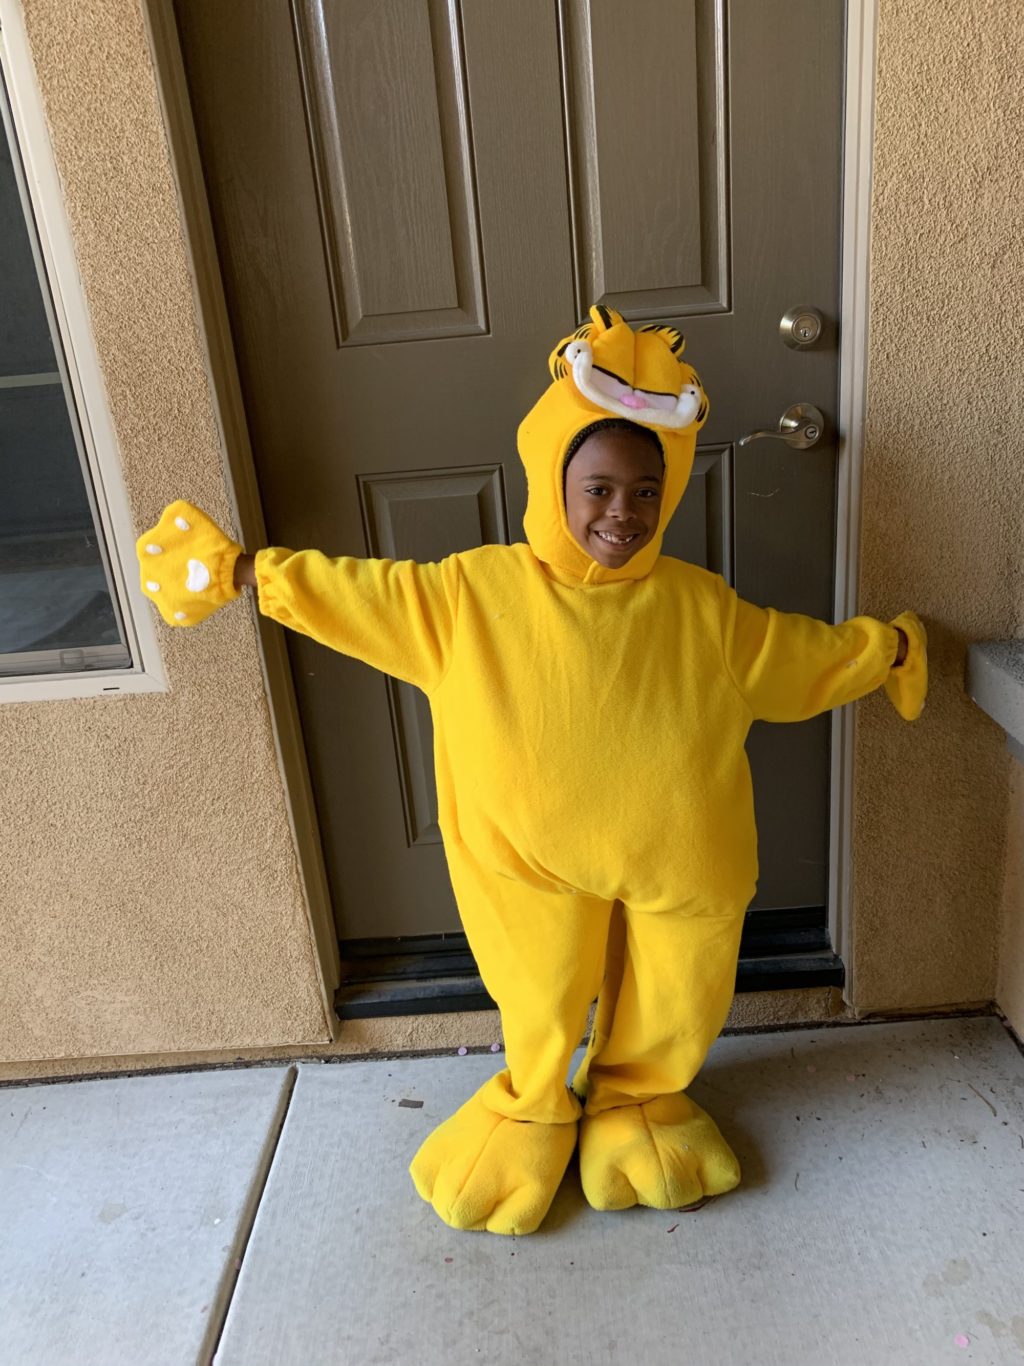
7. Garfield With Oversized Paws
Renee Jones’s Garfield submission begins with a very good reason to choose a costume: the child had been asking to dress as her favorite character. In the photo, the cat hood, broad paws, and warm yellow-orange outfit make the idea clear without a pile of accessories. It’s a useful reminder that a familiar character can be enough.
The account doesn’t give a homemade build method, so this is an outfit reference rather than a craft tutorial. Notice how the face sits above the wearer’s face on the hood. The cat expression remains visible while the child can still grin for the picture.
If you’re adapting Garfield with ordinary clothes, concentrate on the orange base, dark stripe details, and ears before adding anything else. A lasagna-themed prop can extend the joke, but the photo shows that it isn’t necessary. The costume guide below gives you a starting point for assembling your own interpretation.
Photo and entry submitted by Renee Jones. View the original Garfield With Oversized Paws entry.
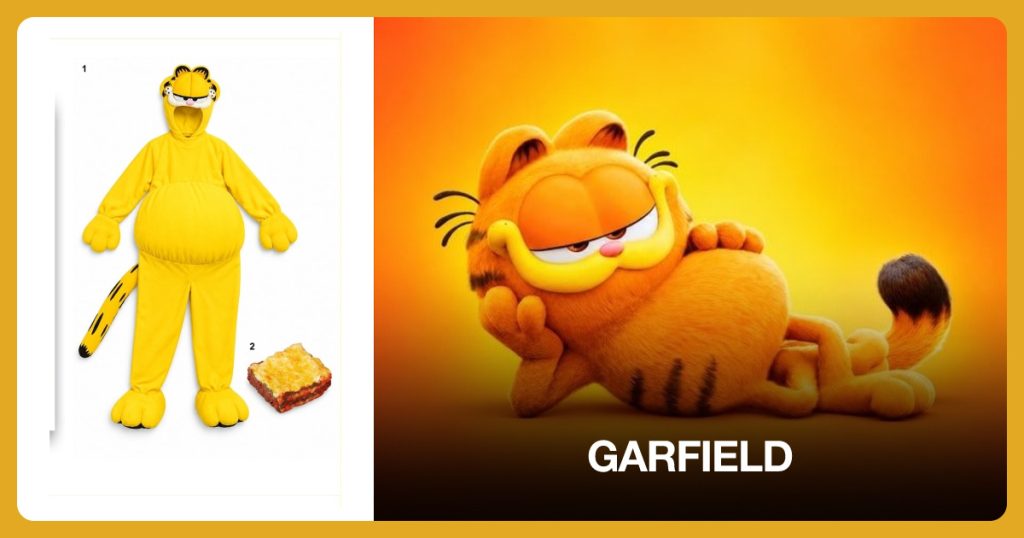 Make this costume
Garfield
See the outfit, supplies and step-by-step guide.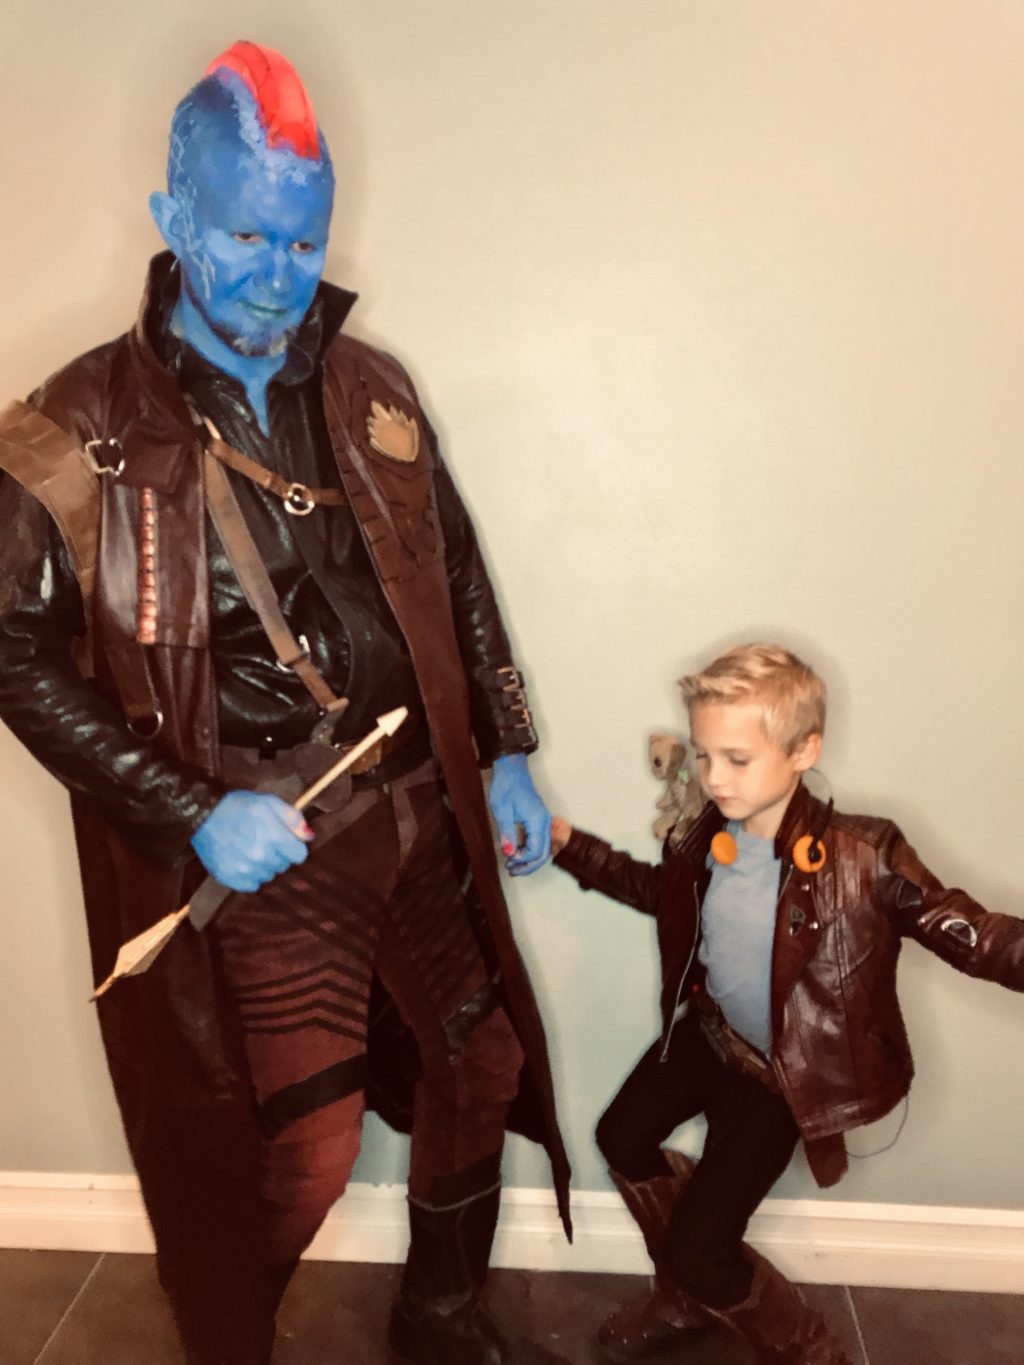
8. Star-Lord and Yondu From Altered Clothes
Jen Peterson’s photo pairs a child’s Star-Lord outfit with an adult Yondu, complete with blue face color and a raised head fin. Their dark jackets have enough added structure to look like character clothes rather than ordinary outerwear. The two people can wear different costumes while sharing the same adventurous look.
Jen’s maker account describes starting with thrift-store clothing and extensively altering it. She added raised jacket details, changed garment proportions, and made several accessories. That is the part worth studying: a useful starting garment can save you from making every seam from scratch, while the added pieces supply the character-specific finish.
Pick the jacket first, then identify the few details that distinguish your chosen version. For a pairing, give each character a separate signature feature; Yondu’s fin and blue coloring shouldn’t disappear into Star-Lord’s outfit. Jen also describes music as part of the presentation, making the dance-off a natural finishing touch.
Photo and entry submitted by Jen Peterson. View the original Star-Lord and Yondu From Altered Clothes entry.
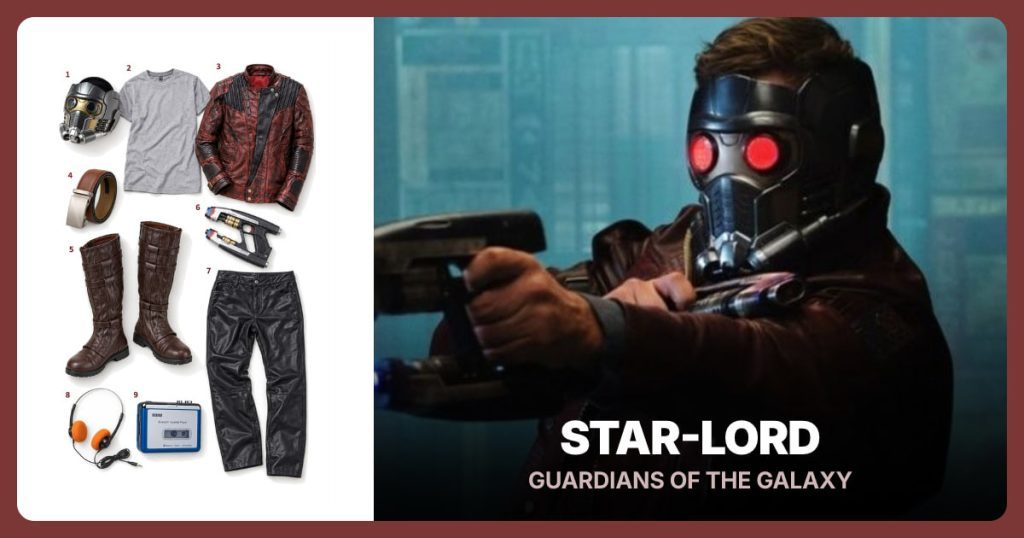 Make this costume
Star-Lord
See the outfit, supplies and step-by-step guide.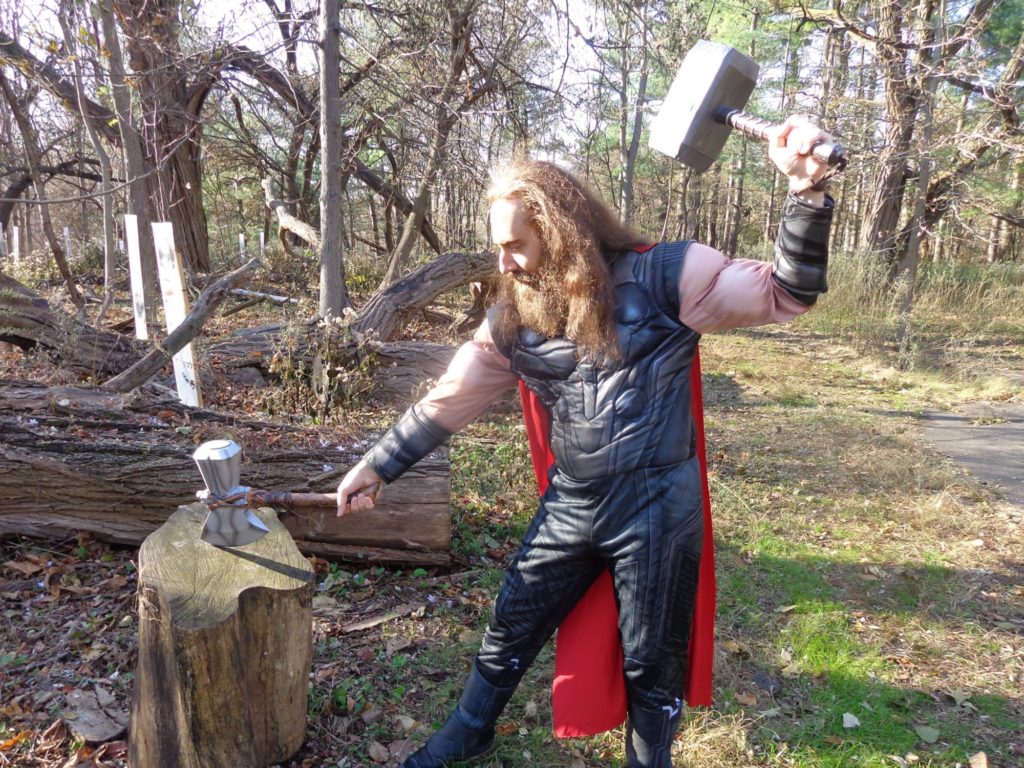
9. Thor With a Classic Winged Helmet
Daniel Clark’s Thor combines long hair, a beard, dark armor, a red cape, and the character’s weapons. His account explains that he mixed a movie-inspired outfit with a more classic winged helmet. The selected outdoor photo shows the cape and hair adding movement to the pose, rather than simply hanging behind the armor.
This entry is useful for anyone deciding between versions of the same character. Daniel didn’t try to include every detail from every Thor appearance. He chose an outfit he liked, then added the helmet as a deliberate nod to another version.
Make that choice before collecting accessories. Decide which outfit is your base and which single detail you want to borrow from elsewhere. A red cape is a strong visual anchor, so leave room for it in your photograph. You can also take pictures with and without the helmet, as Daniel did, to see which version you prefer.
Photo and entry submitted by Daniel Clark. View the original Thor With a Classic Winged Helmet entry.
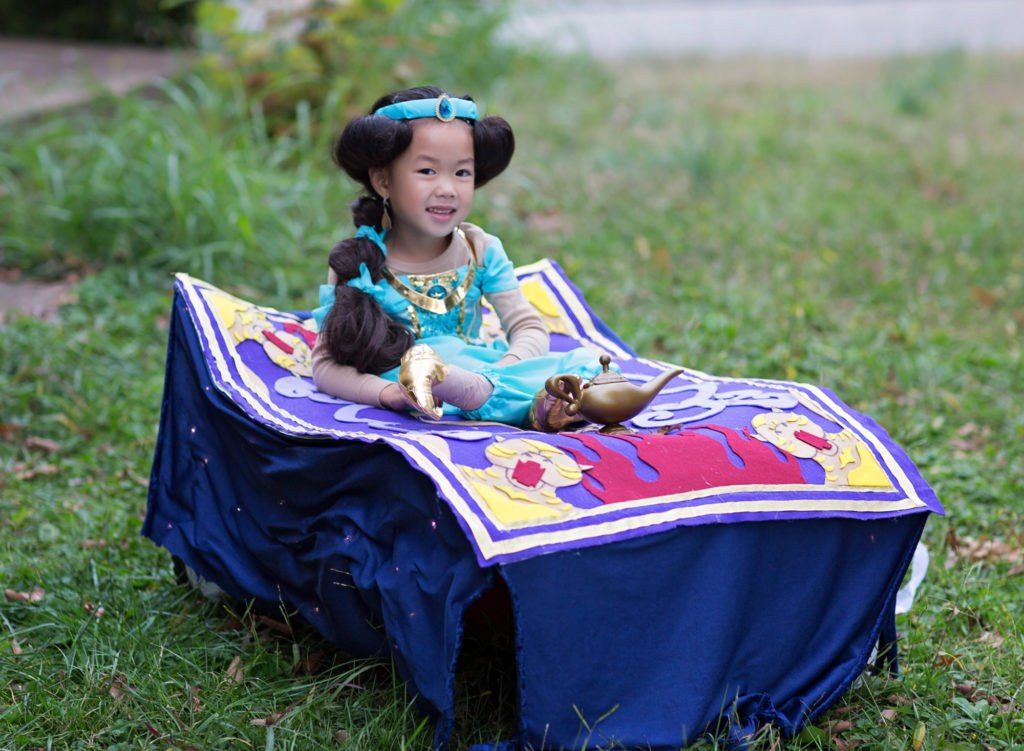
10. Jasmine on a Flying Carpet
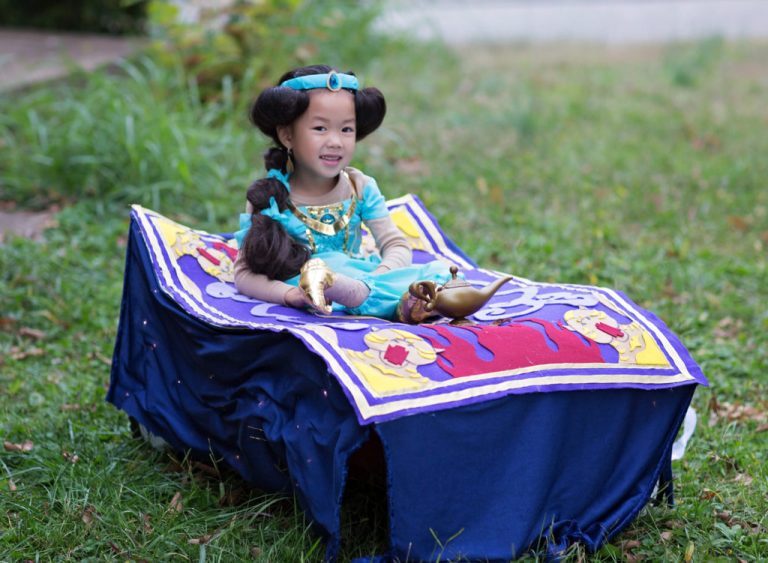
Duong Ho’s Jasmine costume adds a whole magic carpet beneath the character. The photo shows a purple patterned surface, curled edges, and dark blue fabric around the base. The child appears seated above the carpet, with the familiar outfit and jewelry providing the character reference.
Duong’s account describes making the carpet design from felt and arranging it over a wagon. Costume legs help create the seated illusion. It’s a substantial prop build, but the design lesson is straightforward: the carpet adds the fantasy while Jasmine’s clothes keep the character easy to identify.
You don’t have to reproduce the entire wagon treatment to borrow the idea. A small carpet-inspired accessory or a patterned backdrop can bring the same colors into a simpler outfit. If the carpet is your main project, keep its central pattern and edge treatment clear. The Jasmine guide below covers the clothing separately so you can decide where to spend your making time.
Photo and entry submitted by Duong Ho. View the original Jasmine on a Flying Carpet entry.
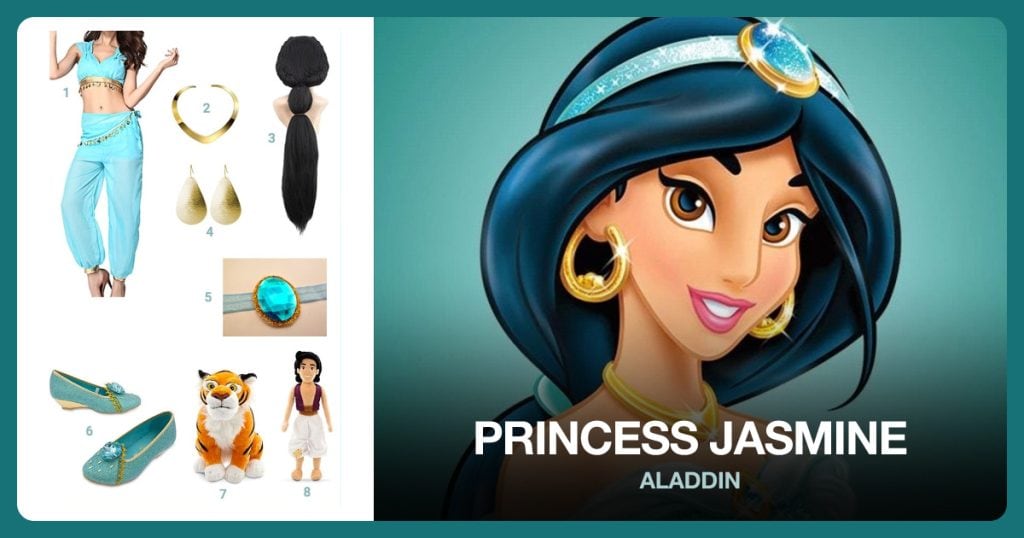 Make this costume
Princess Jasmine
See the outfit, supplies and step-by-step guide.Let one character detail lead
A red hood, cat ears, a blue head fin, or a flying carpet can do more for recognition than lots of unrelated accessories. Choose the exact character outfit you like, then give its strongest detail room to show.
Use the guide, personalize the finish
The guide cards help with the clothing and accessories. The contest photos show what happens when a maker adds a pose, a prop, a different material, or another character. Start with the pieces you need, then decide which personal touch is worth making.
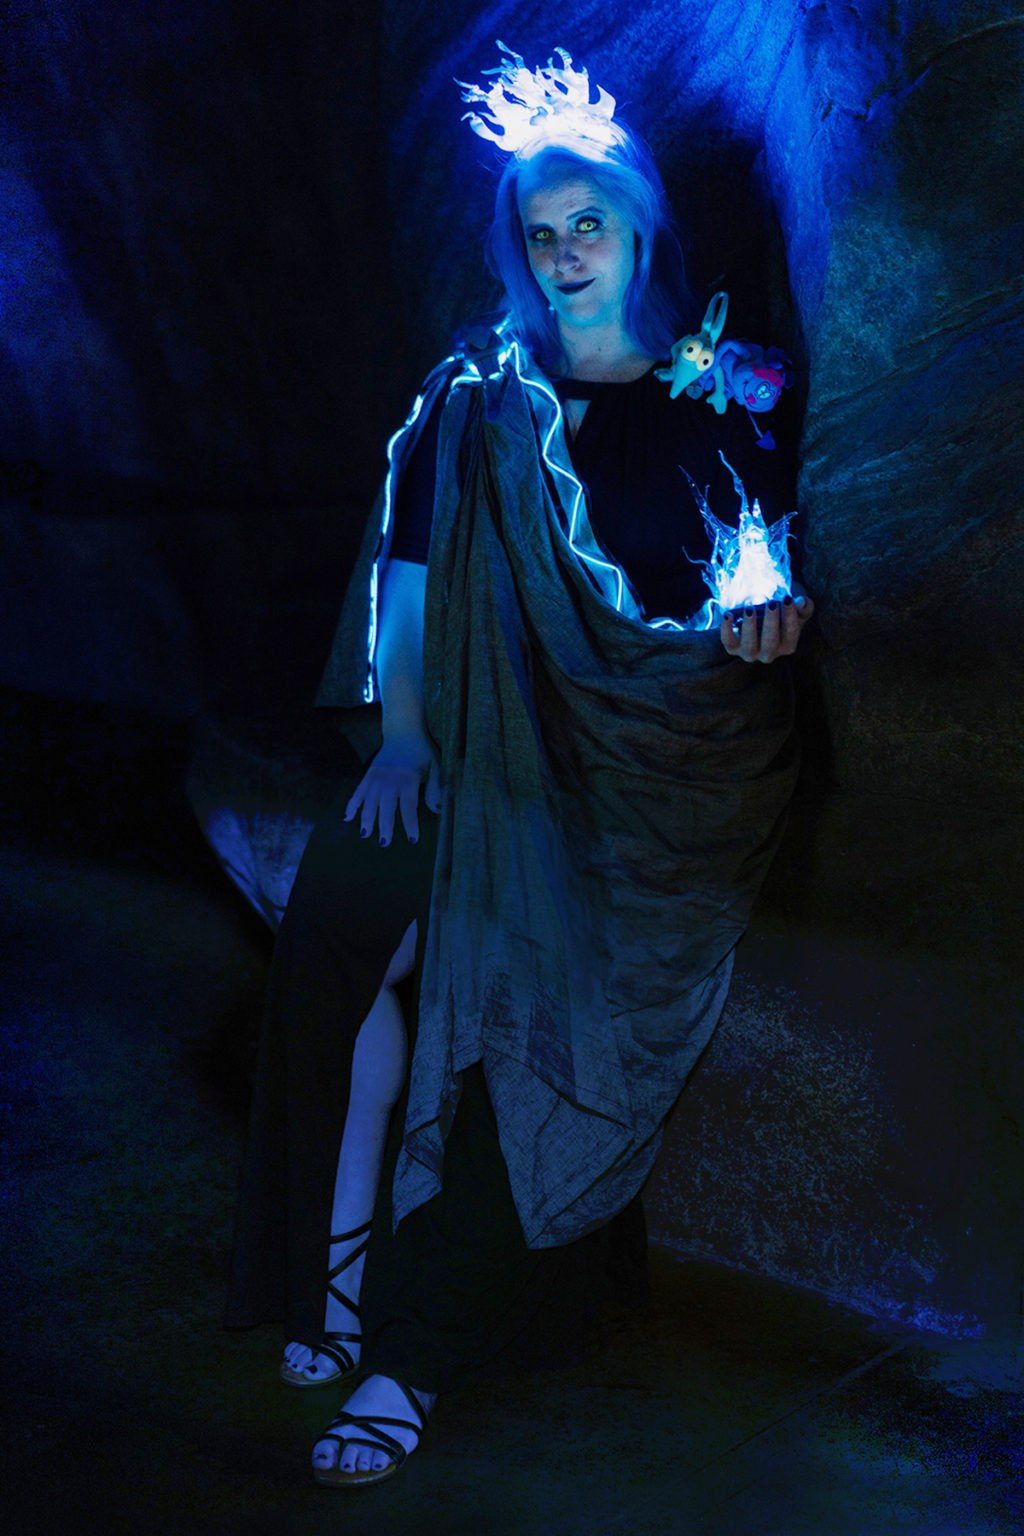
11. Hades With Blue Flames
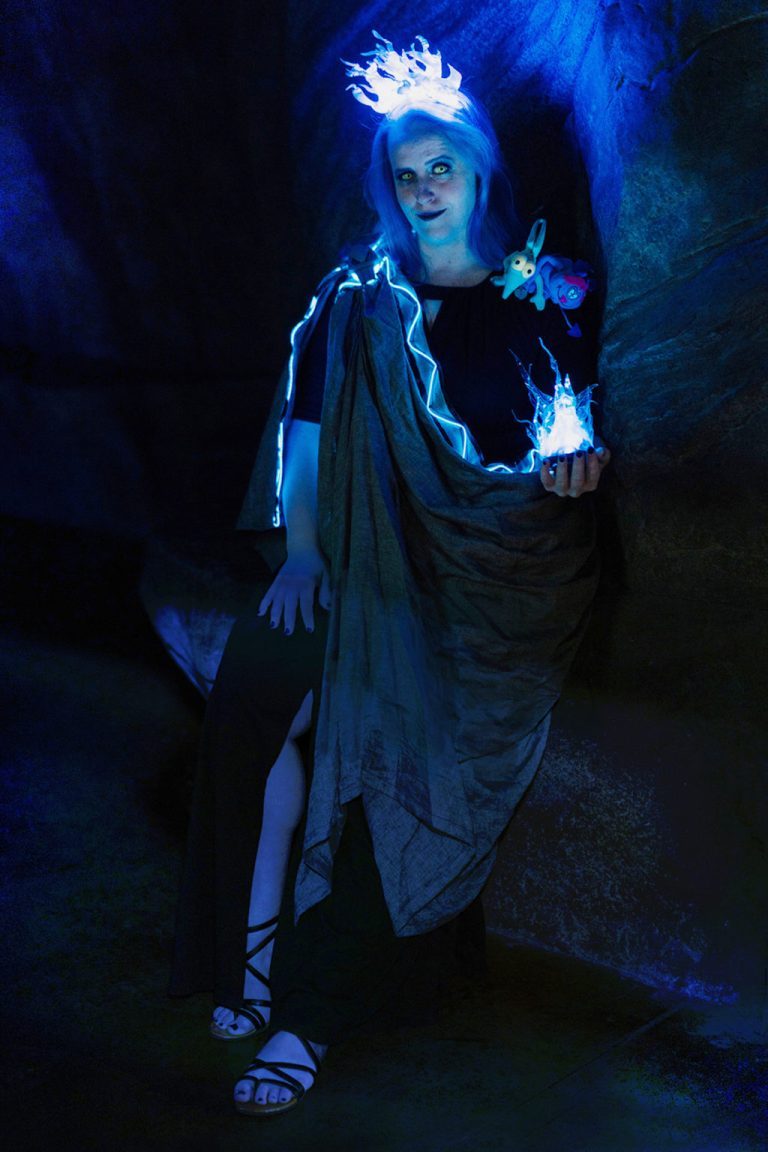
Leanna Read’s Hades uses a dark dress, a gray wrap, a skull shoulder clasp, and bright blue flames. In the photo, the flame above the head and the light around the wrap pull your attention toward the face and upper body. The silhouette remains simple enough that those details can dominate.
Leanna describes making the wrap and clasp, along with the flame accessories, for a villains group theme. The selected picture shows her Hades individually, so you can appreciate the outfit without needing the rest of the group beside it.
The detail to borrow is the contrast between a quiet dark base and one vivid character feature. For a simpler version, put the effort into a blue flame-shaped headpiece and a recognizable shoulder wrap. Keep the shapes large enough to read in a normal photo. The guide card provides another route to the outfit, while Leanna’s entry shows how she personalized the finished look.
Photo and entry submitted by Leanna Read. View the original Hades With Blue Flames entry.
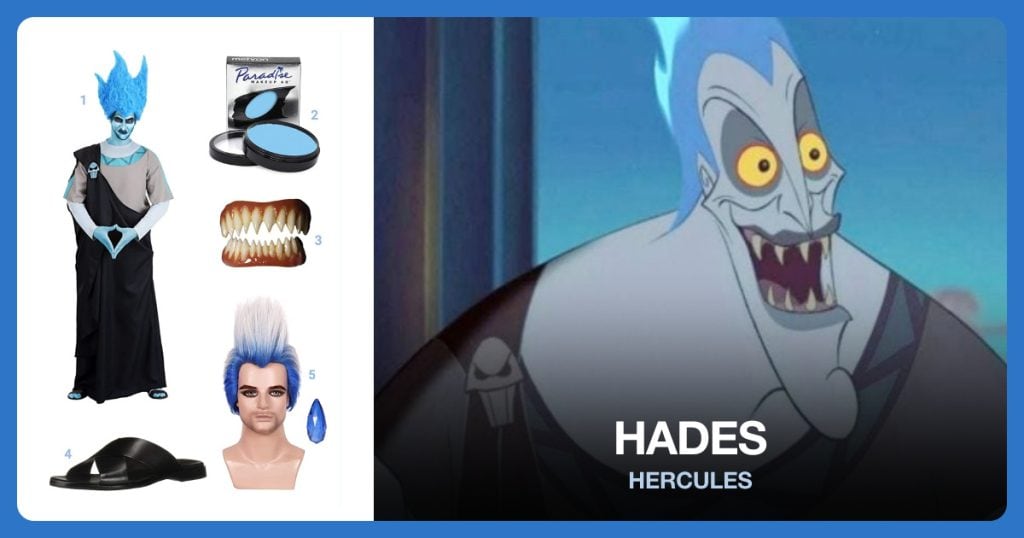 Make this costume
Hades
See the outfit, supplies and step-by-step guide.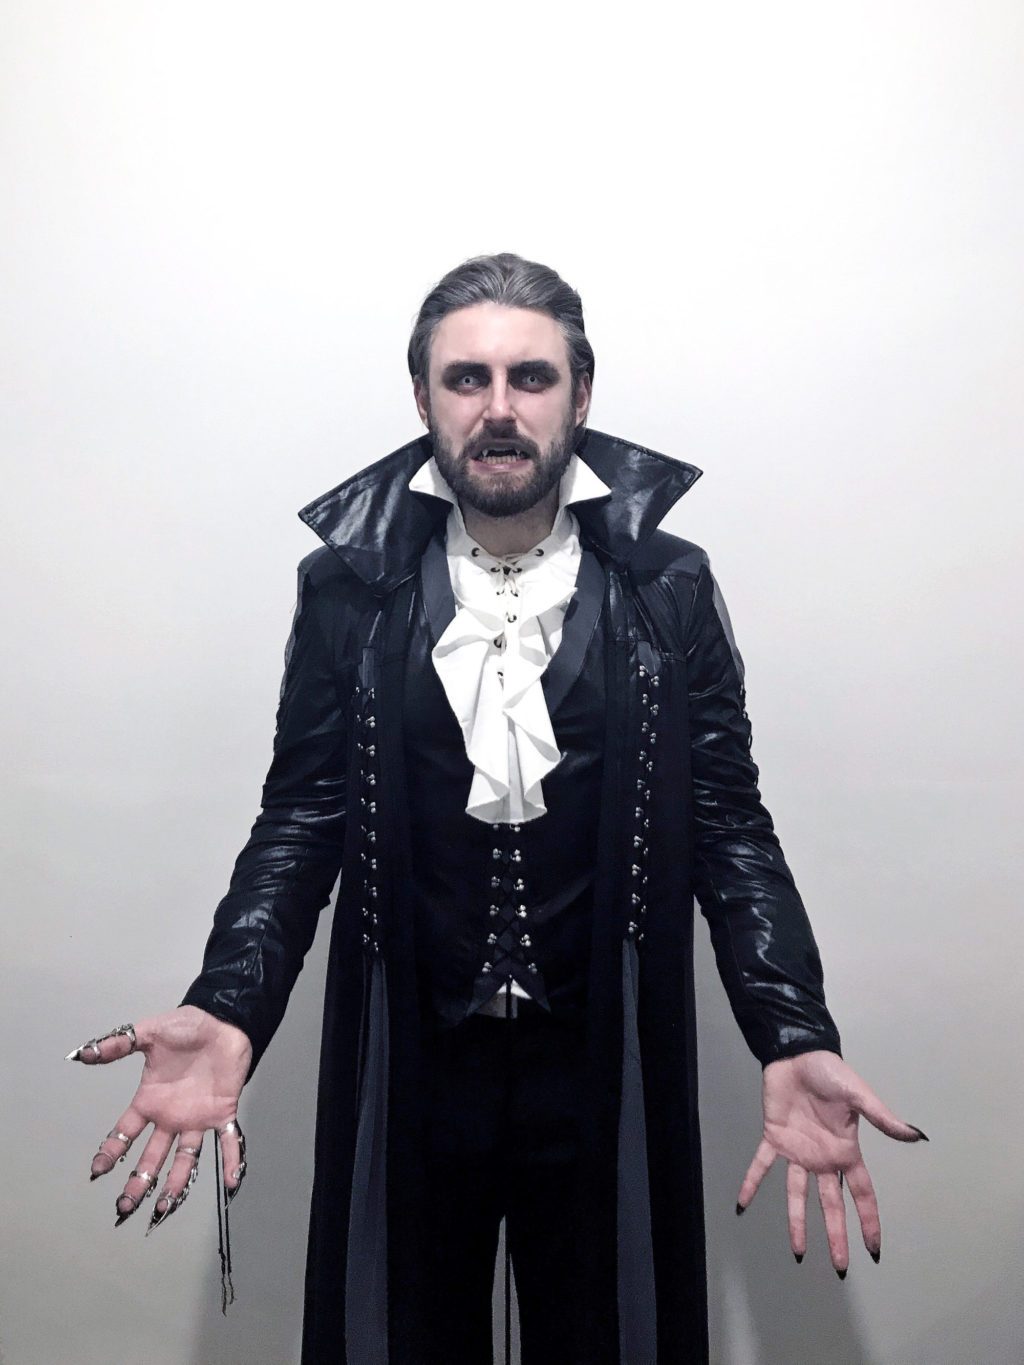
12. An Ancient Vampire From Mixed Pieces
Mike Comerford’s vampire has the presence of an old portrait: black layers, a white ruffled neckline, a high collar, pale makeup, and long finger jewelry. Nothing needs to be bright for the look to be dramatic. The contrast around the face does most of the work.
Mike’s account describes combining an existing magician-style robe and waistcoat with a pirate shirt and black trousers. That mix gives the costume a useful sense of age without requiring one matching packaged outfit. The rings and nails then sharpen the character’s hands, which are clearly visible in the pose.
Choose one ornate feature to lead your version: the collar, the shirt front, or the coat. Then let the other pieces support it rather than compete. A plain dark lower half can make the upper layers feel richer. For photographs, bring the hands forward if the jewelry is part of the character instead of hiding it beneath long sleeves.
Photo and entry submitted by Mike Comerford. View the original An Ancient Vampire From Mixed Pieces entry.
 Make this costume
Vampire
See the outfit, supplies and step-by-step guide.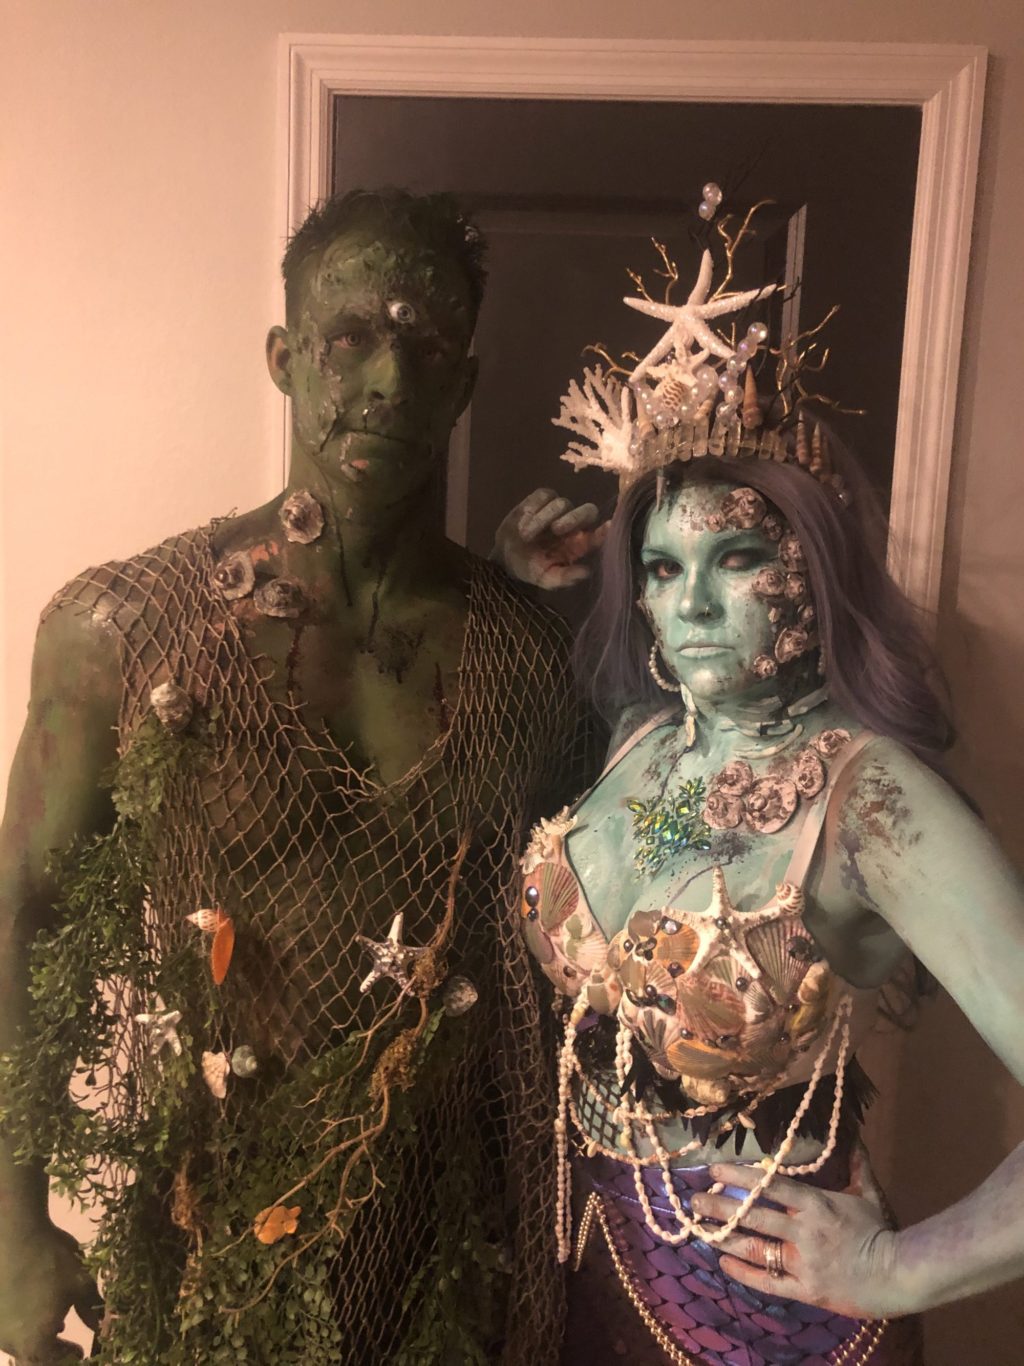
13. The Dead Sea: An Underwater Horror Pair
Bre’s Dead Sea entry combines an underwater theme with horror makeup. Two people wear sea-colored faces, shells, netting, and weathered-looking textures. A branching crown makes one figure taller, while the other’s dark layers keep the pair from looking like identical copies.
Bre says the costumes were made from scratch and that clay was used for barnacles. The photo gives you several details to study: clusters of shells, uneven surface texture, and pale highlights against darker sea-green areas. Together, they suggest something that has spent a long time beneath the water.
If this is your direction, pick one sea detail to repeat across the pair. Shell clusters, tangled netting, or coral-like shapes can connect different outfits. Keep the face and main accessories distinct enough to see; covering every inch with the same texture can flatten the effect. This is a strong alternative to wearing two conventional matching mermaid outfits.
Photo and entry submitted by Bre. View the original The Dead Sea: An Underwater Horror Pair entry.

14. Galaxy Gal With a Glowing Centerpiece
Jessica LaBarre’s Galaxy Gal centers the costume on a glowing blue orb at the chest. Dark hair, forehead detailing, and the blue light around the face give the image a futuristic creature feel. The bright focal point makes the costume interesting even though the photo is framed relatively close.
Jessica’s account identifies the orb as a fillable ornament with small lights and describes handmade pieces around it. The useful design choice is the placement of the light. It sits where the viewer can immediately understand it as part of the creature, rather than an unrelated accessory held off to one side.
For your own original character, choose one feature that suggests what the creature is: a luminous emblem, an unusual head shape, or a repeated texture. Build the rest of the styling around that choice. You can borrow this approach without copying the specific makeup, especially if you prefer a costume with the focal detail attached to clothing.
Photo and entry submitted by Jessica LaBarre. View the original Galaxy Gal With a Glowing Centerpiece entry.
15. A Foam-Armored Orc Mashup
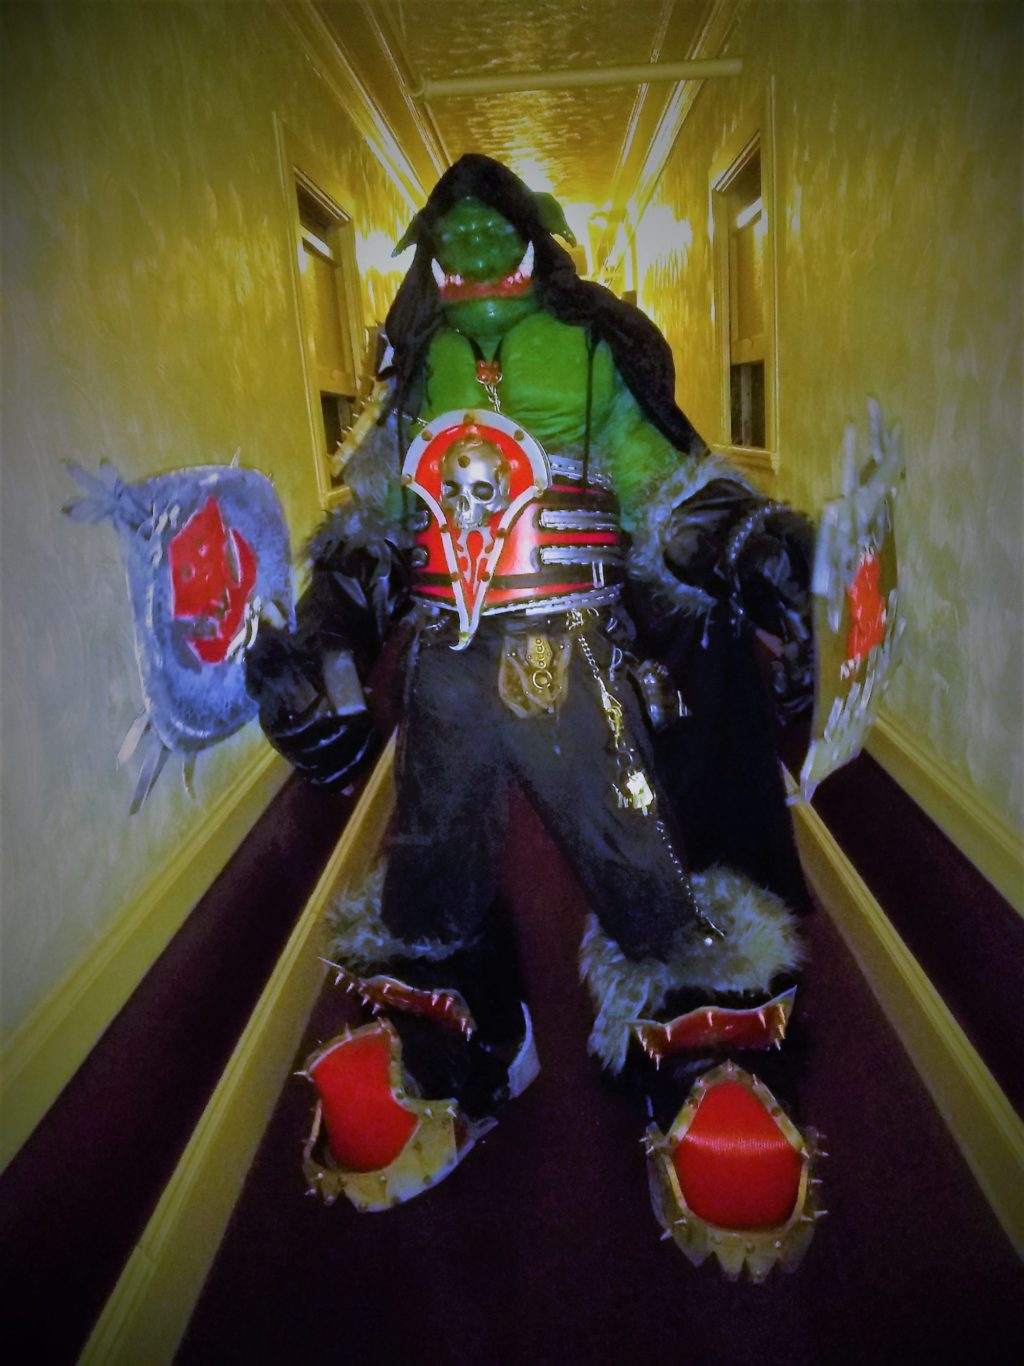
Shawn Killingsworth’s green orc combines huge armor shapes, a hood, fur, a shield, and an axe. The photo fills the hallway with the character, emphasizing the broad shoulders and oversized boots. It’s a deliberately exaggerated costume rather than a subtle outfit reference.
Shawn describes inspiration from both World of Warcraft and Warhammer, with foam used throughout the armor and props. The photo shows why large shapes matter before the tiny finishing details: the shoulders, belt, and footwear establish the character’s scale even at a distance.
If you love this look but want a smaller project, choose one armor area to exaggerate instead of enlarging the whole costume. Big shoulder pieces over a simpler base can carry the same visual idea. Repeat the armor color on the belt or cuffs so it looks intentional. Save fine scratches and decorative markings until the main shapes are working together.
Photo and entry submitted by Shawn Killingsworth. View the original A Foam-Armored Orc Mashup entry.
Choose your main craft project
The next five ideas put much of their effort into a creature head, painted garment, vehicle, or wearable structure. If you love one of those techniques, let that be the project. You can simplify the rest of the outfit around it.
Keep the useful part of the idea
A smaller dragon head, a castle-painted cape, or a shop sign can carry the same theme. The original maker accounts explain what these entrants built; choose the scale that fits your own plans rather than assuming every detail needs to be reproduced.
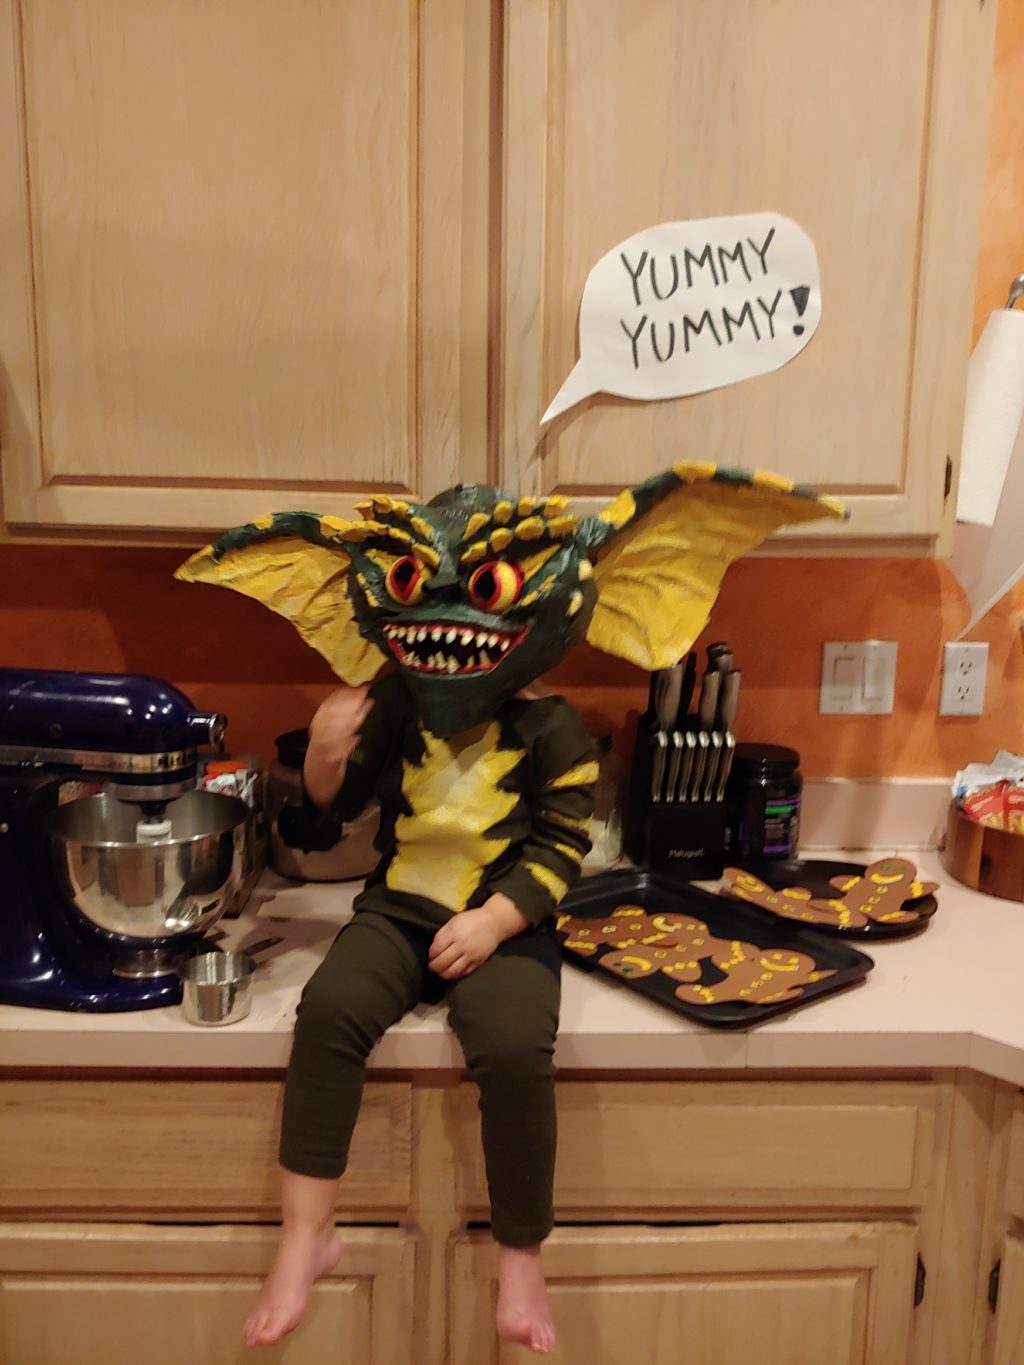
16. A Handmade Gremlin With Huge Ears
Amanda Skinkle’s gremlin has enormous ears, a toothy face, and a patterned creature body. In the photo, the costume sits among kitchen snacks with a speech bubble overhead. That presentation adds a joke while keeping the handmade head as the clear centerpiece.
Amanda’s long maker account describes gradually shaping the face, building up layers, painting the details, and adapting clothing for the body. It’s worth reading for the sequence of decisions, rather than assuming the finished creature was one quick craft session. The head has several separate areas of texture and color that took attention.
The ears are the first detail to borrow. They establish a strong creature outline before you get close enough to see the teeth. A simpler gremlin-inspired outfit could concentrate on the head shape and a coordinated top. If you’re making a full creature, plan the head and body together so their colors feel connected.
Photo and entry submitted by Amanda Skinkle. View the original A Handmade Gremlin With Huge Ears entry.
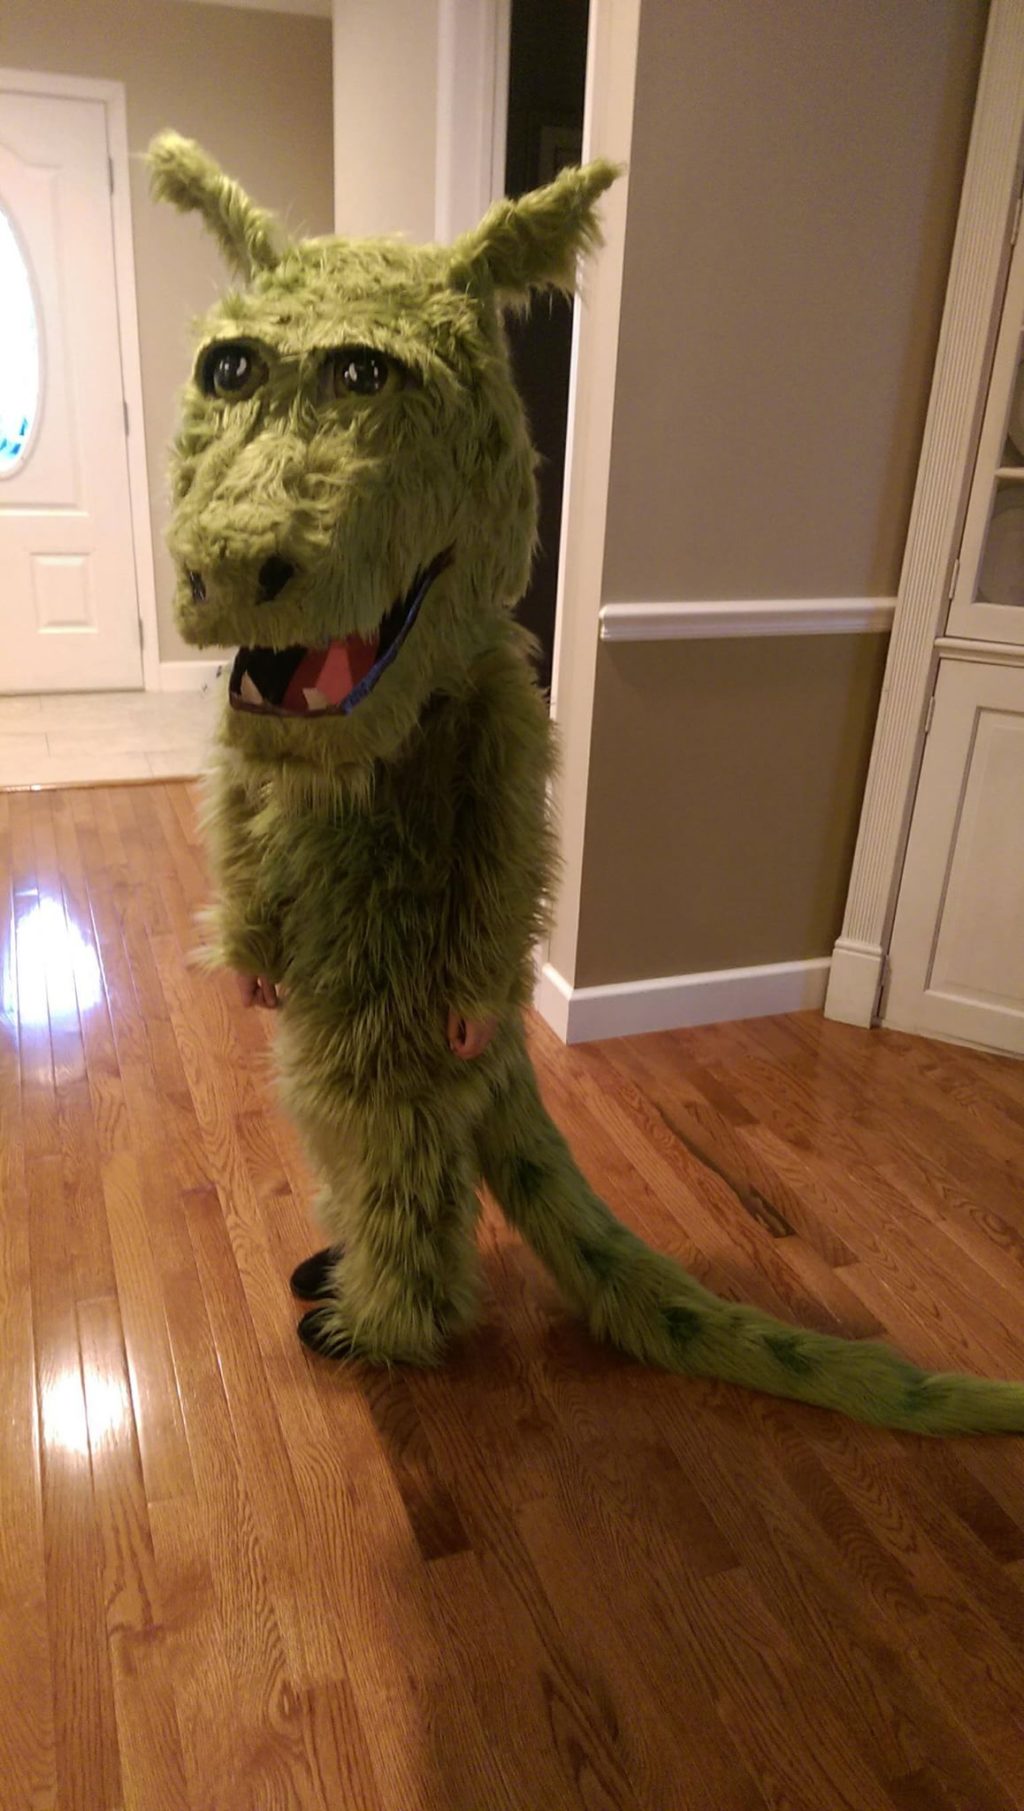
17. Pete’s Dragon With a Furry Headpiece
Jessica LaBarre’s furry dragon has a large, friendly head, rounded eyes, a visible mouth, and a long tail. The green fur makes the head and body feel like one creature. The photo is especially helpful for seeing how the costume’s outline changes from the tall head down to the trailing tail.
Jessica describes a handmade head with a cardboard base and eyes made using fillable ornaments. The soft exterior disguises the underlying structure. That combination of a firm shape and a furry finish is what makes the head feel more substantial than a simple animal hood.
Choose the expression before the tiny details. Wide eyes and a rounded mouth give this dragon a very different personality from a narrow-eyed, sharp-toothed creature. If you’re adapting the idea, keep the head, body, and tail in the same color family. A smaller headpiece can still capture the friendly look without reproducing every part of the build.
Photo and entry submitted by Jessica LaBarre. View the original Pete’s Dragon With a Furry Headpiece entry.
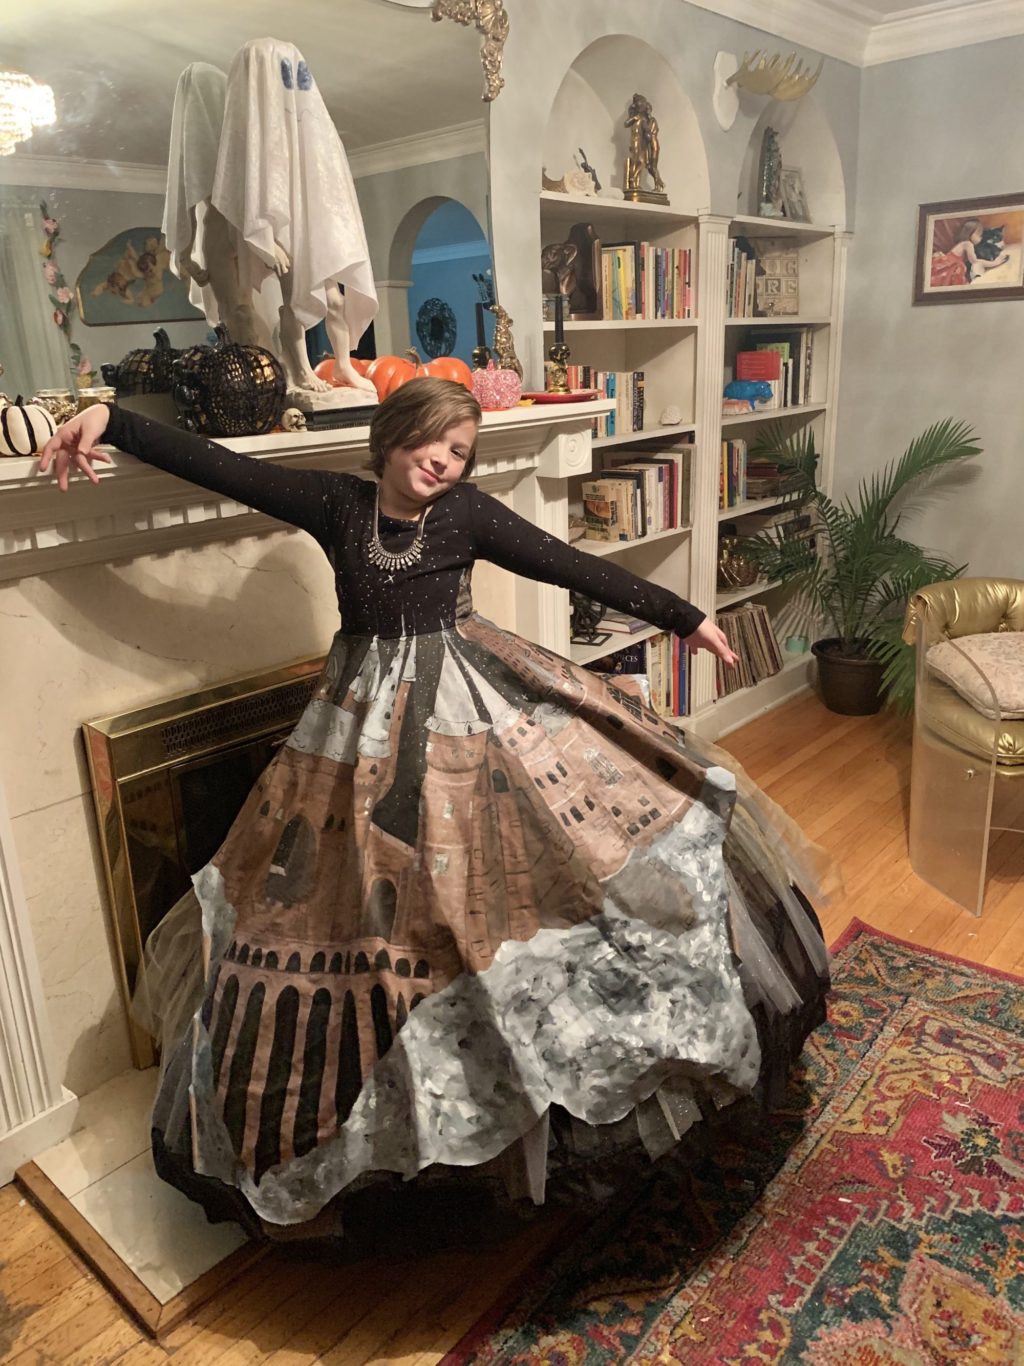
18. Hogwarts Painted Across a Dress
Emily Harrison’s daughter chose Hogwarts itself instead of one of its students. The wide skirt becomes the castle, with towers and stonework painted across its surface. Above it, a dark bodice suggests the sky. The shape of the dress gives the artwork enough room to tell the story.
Emily’s account describes sewing the dress, drawing the castle, and painting it over an extended period. She also describes glow details in the windows and stars. The selected photo shows the child and dress on their own; the other family roles mentioned in the account aren’t pictured here.
This is a wonderful way to turn a favorite setting into a costume. A skyline, a house, or a storybook landscape could work on a skirt, cape, or coat. Choose a garment with a broad uninterrupted area, then make the most recognizable buildings larger than the background details. Start with the outline before filling every window.
Photo and entry submitted by Emily Harrison. View the original Hogwarts Painted Across a Dress entry.
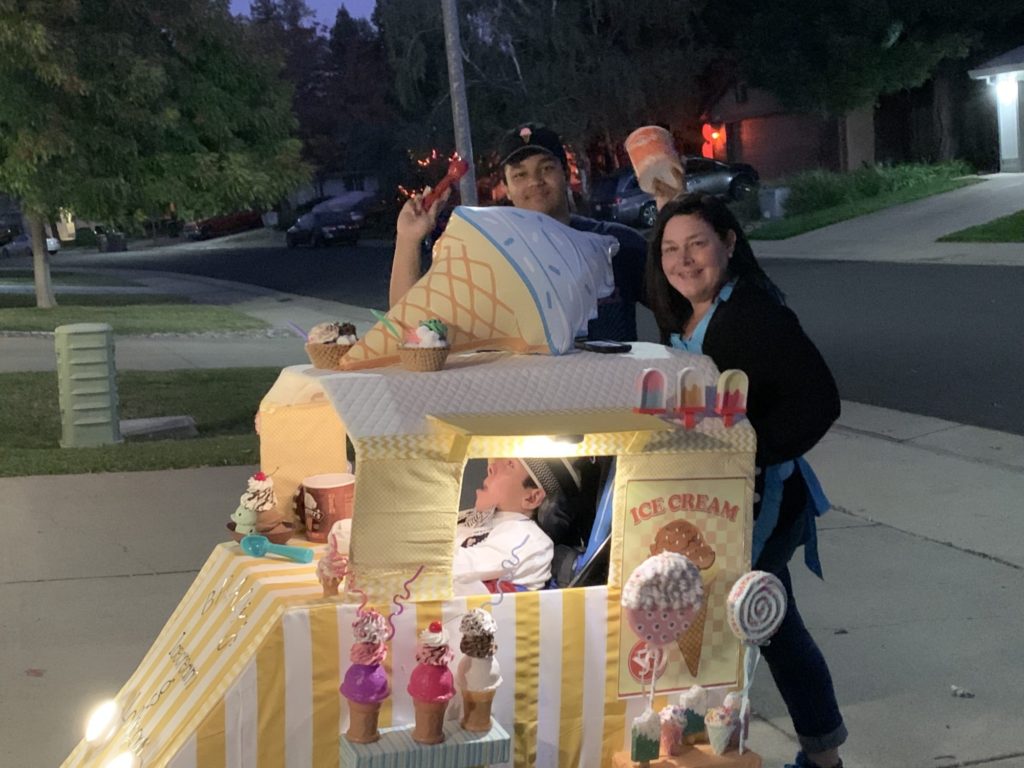
19. Brady’s Ice Cream Truck
Carla Snyder’s ice cream truck brings together yellow-and-white stripes, a serving window, a sign, and oversized frozen treats. Brady sits at the center of the truck costume around his wheelchair, while the people beside him join the theme. The repeated stripes make the design feel like a cheerful neighborhood shop.
Carla’s account describes cardboard and foam board among the materials, plus lights and ice cream music. The photo already communicates the idea through the window and treat display, so the extra effects build on a clear visual foundation.
Borrow the shop details: a big sign, one service opening, and a small menu of recognizable treats. For a mobility-device costume, develop the design around the wearer’s own access and movement needs; the entry photo is inspiration rather than an attachment plan. If you prefer a clothing-based version, an ice cream seller and a frozen-treat partner can use the same colors and signs.
Photo and entry submitted by Carla Snyder. View the original Brady’s Ice Cream Truck entry.
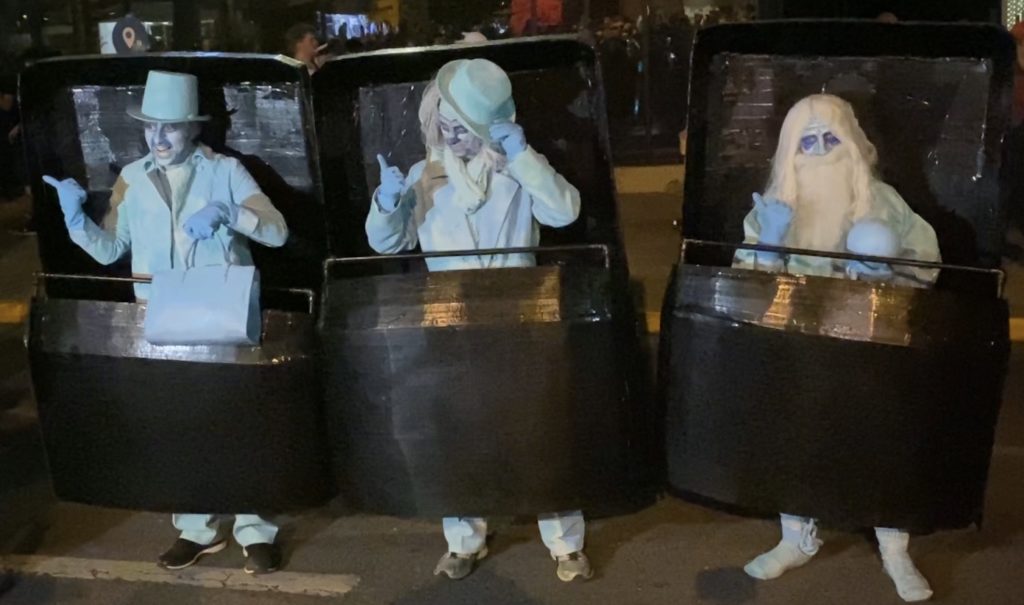
20. Hitchhiking Ghosts in Their Doom Buggies
Ian Nemser’s three hitchhiking ghosts arrive inside their own dark ride-carriage shells. Pale faces, hats, hair, and a raised thumb distinguish the ghosts, while the repeated carriages connect them as a trio. The photo feels like a piece of the attraction has stepped into the room.
Ian’s detailed account describes cardboard carriage shapes and several changes to the wearable support arrangement. It’s a useful example of a finished costume that involved practical problem-solving after the first design. The dark shells also provide contrast, making the pale outfits easier to see.
You can borrow the setting at a smaller scale. A seat back, doorway-shaped panel, or attraction-inspired sign can give a ghost costume context without surrounding the wearer with a whole carriage. Keep each person’s face and signature accessory visible. For three people, choose a distinct hat, hairstyle, or gesture for each character so the shared theme still allows individual roles.
Photo and entry submitted by Ian Nemser. View the original Hitchhiking Ghosts in Their Doom Buggies entry.
Which costume would you actually enjoy making?
If a particular photo keeps pulling you back, identify what you like about it. Is it the joke, the character, the painted surface, or the big prop? That tells you where to put your effort.
Write down the one part you want to make, then the clothes or accessories that will support it. An ambitious headpiece with a simple outfit can be a better project for you than an elaborate costume you don’t enjoy working on.
Pick the detail you can’t wait to make
The strongest idea here might be a whole cardboard machine, but it could also be a red hood, oversized cat paws, or icing on a brown outfit. Choose something you’re excited to wear and give that detail your attention first. The rest of the costume should help it make sense.
For more real examples, browse the costume contest archive. If you’ve settled on dressing with someone else, try our couples costume ideas or family costume ideas next. Those articles help you choose the lineup; this one gives you plenty of creative details to make it your own.